Set up Recommendations


🚧

Recommendations are based on plays with a media ID and utilizing a JWP data source, not an OTT Apps data source. Read Create reports for apps to learn more about OTT Apps data source analytics.


Recommendations automate the generation of a playlist based on the currently-watched video and provide you options to customize the appearance and behavior of that playlist. To set up Recommendations, you only need to create a recommendations playlist and then associate the playlist with a player.

1201

Recommendations settings
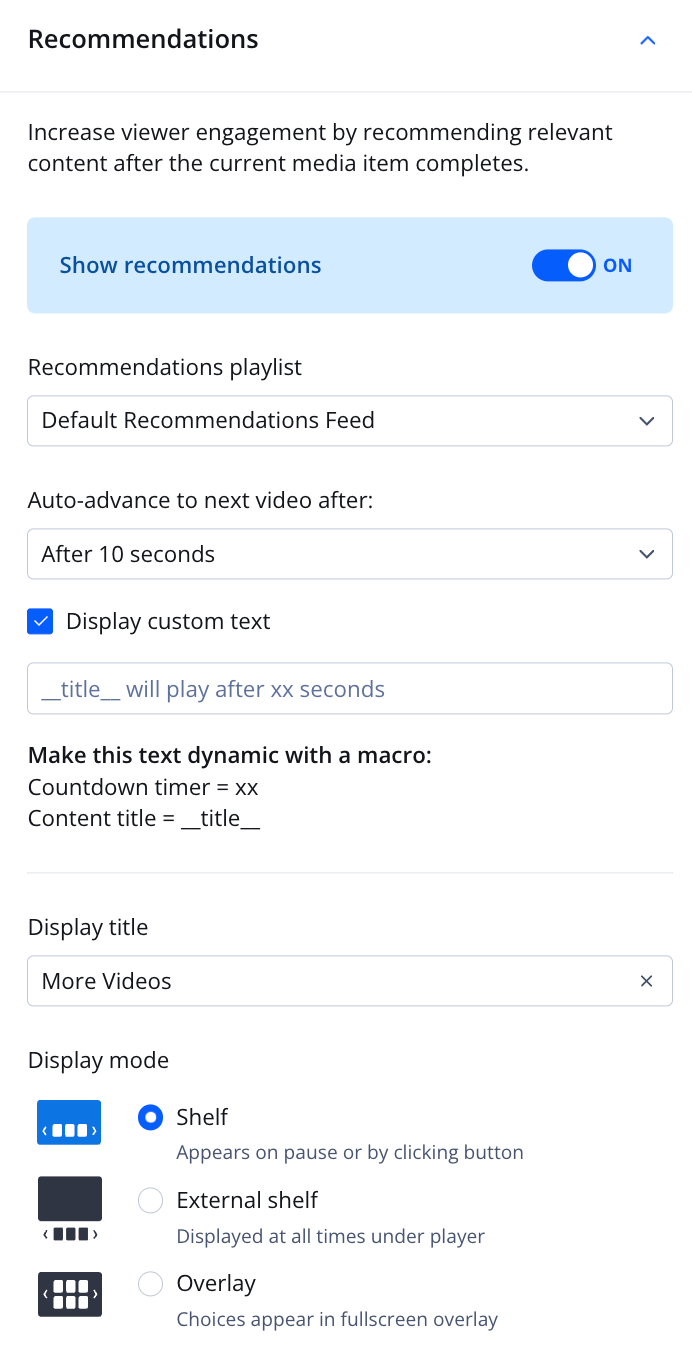
 in the JWP dashboard.


Use the following sections to set up JW Recommendations from your JWP dashboard.

🔑

If you are a developer or have developer resources, you can use the set up Recommendations with the Management API and the JavaScript Player library.


Associate a playlist with a player

To start recommending content to your viewers, you must associate a recommendations playlist with a player:

  1. Create a Recommendations playlist.
  2. Click Players > the name of the player > Recommendations.
  3. Click the toggle to turn ON the Recommendations features.
  4. (Optional) From the Select a Recommended Playlist dropdown menu, select a playlist. If you do not have additional playlists listed or prefer not to choose a playlist, the Default Recommendations Playlist will be used.NOTE: A recommendations playlist can be associated with multiple players.
  5. Click SAVE.

You have enabled Recommendations for all videos that are played within your selected player.


Customize the Recommendations experience

You can customize some of the default features of the recommendations experience:

  • Set when the next video plays
  • Rename the recommended videos title
  • Select the presentation of the recommended videos

Set when the next video plays

  1. In the Next Up section, choose when to Play Next Video from the dropdown menu.
  2. (Optional) Click the Custom Text checkbox and enter a message. Read the following Countdown overlay section to learn more about this message
  3. Click SAVE.

Countdown Overlay

The countdown overlay only appears if you select after 5 seconds, after 10 seconds, or after 30 seconds from the Play Next Video dropdown menu. A white line traces the border of the next video to play as part of the countdown.


📘

The countdown overlay looks like the overlay display mode option. However, only the countdown overlay has a countdown and customizable message.


Above the title and description of the next video to play, the countdown message displays. The default message is Next up in X. X represents the number of seconds remaining in the countdown. When you click Custom Text in your dashboard, you can customize this message.

You can use the following macros in your custom message. We suggest using **_title will play in xx seconds_**.


OPTIONDESCRIPTION
xxUse this macro as a placeholder to dynamically populate the remaining time, in seconds, before the next video begins to play.
__title__Use this macro as a placeholder to dynamically populate the title of the next video.

Rename the recommended videos title

The default title for recommendations icon and countdown overlay is More Videos.

Depending on the selected Display Mode, this text appears in the following locations:


DISPLAY MODELOCATIONS
Use the player default• Next to the Recommendations icon above the control bar
• Title of the countdown overlay
Overlay• Tooltip that appears when a viewer hovers over the Recommendations icon in the control bar
• Title of the countdown overlay
Shelf• Next to the Recommendations icon above the control bar
• Title of the countdown overlay
Shelf Widget• Above the horizontal bar of thumbnails beneath the player
• Title of the countdown overlay

Use the following steps to customize this title.

  1. Enter a title in the textbox to replace the default title.
  2. Click SAVE.


Select the presentation of the recommended videos

The display mode determines how the recommended videos will be displayed to your viewers.

  1. From the dropdown menu in the Display Mode section, choose how to display recommended content to the viewer.
  2. Click SAVE.

OPTIONDESCRIPTION
Use the player default(Same as Shelf) Adds a horizontal bar of thumbnails above the control bar that allows viewers to browse recommended videos

The shelf appears when a viewer clicks the recommendation icon located above the control bar during playback or pauses playback.
OverlayAdds a recommendations icon to the control bar

The overlay appears when a viewer clicks the recommendations icon in the control bar. The overlay takes over the player and pauses playback. We recommend using one of the other display options that does not stop the video if a viewer explores the recommended videos.
ShelfAdds a horizontal bar of thumbnails above the control bar that allows viewers to browse recommended videos during the playback experience and when playback is paused

The shelf appears when a viewer clicks the recommendation icon located above the control bar during playback or pauses playback.
Shelf WidgetAdds a persistent horizontal bar of thumbnails beneath the player that allows viewers to browse recommended videos during the playback experience.


FAQs

How can I generate reports for Recommendations?

You can use one of the following approaches to generate reports for Recommendations:

  • View the Recommendations Playlists Summary
  • Create a custom recommendations report
  • Create a custom recommendations playlist report


View the Recommendations playlist summary

This report is a default report that includes the following metrics for all recommendation playlists: ad impressions, completes, complete rate, plays, and time watched. This report cannot be edited and covers the last seven days of Recommendations performance.

Use the following steps to access this report:

  1. From your JW Player dashboard, click Custom Reports.
  2. Click Recommendation Playlists Summary from the list of reports.


Create a custom Recommendations report

You can also create a custom report that allows you to specify the date range and metrics to include in the report.

Use the following steps to create a custom recommendations report:

  1. From your JWP dashboard, click Custom Reports.
  2. Click Create Report. A panel appears.
  3. Select a Date Range from the dropdown menu.
  4. Select up to five Metrics to display in the report.
  5. In the Group by section, select Playlist Type.
  6. From the Filter by dropdown menu in the Filter section, select Playlist Type.
  7. From the Choose an option dropdown menu, select Equals.
  8. In the final text box, enter Recommendations.
  9. Click RUN REPORT. After the report completes, the results are displayed. If you do not want to save the report, skip to step 12.
  10. Click Untitled Report and name the report.
  11. Click Save Report.
  12. Click the More menu icon (next to the Save Report button) to Download graph or Download table of the report.


Create a custom Recommendations playlist report

You can also create a custom report for a specific recommendations playlist that allows you to specify the date range and metrics to include in the report.

Use the following steps to create a custom recommendations playlist report:

  1. From your dashboard, click Custom Reports.
  2. Click Create Report. A panel appears.
  3. Select a Date Range from the dropdown menu.
  4. Select up to five Metrics to display in the report.
  5. In the Group by section, select Playlist Type.
  6. From the Filter by dropdown menu in the Filter section, select Playlist.
  7. From the Choose an option dropdown menu, select Equals.
  8. In the final text box, enter the name of the playlist.
  9. Click RUN REPORT. After the report completes, the results are displayed. If you do not want to save the report, skip to step 12.
  10. Click Untitled Report and name the report.
  11. Click Save Report.
  12. Click the More menu icon (next to the Save Report button) to Download graph or Download table of the report.

How can I optimize the performance of Recommendations?

You can optimize the performance of Recommendations by following these best practices:

  • Create a title and description for each video in your library.
  • Group similar categories of videos with tags.
  • Associate a recommendations playlist with each player that you embed.
  • Replace dynamic, trending, and manual playlists with recommendations playlists.
Can I promote specific videos when using Recommendations?

Yes. Use the following steps to promote up to two playlists that will appear when the countdown overlay appears:

  1. From your JW Player dashboard, click Playlist > name of the recommendations playlist.
  2. In the Promoted Content section of the SETUP tab, select a manual, trending, or dynamic playlist from the drop-down menu. Once you have chosen one playlist, an option to select a second playlist appears.
  3. (Optional) Select another manual, trending, or dynamic playlist to promote from the second drop-down menu.
  4. Click SAVE.
What is the minimum number of videos that I need in my library?

To derive the most benefit from Recommendations, you should have a minimum of 50 videos in your library.