Configure DNS masking
This article explains what DNS masking is and how-to get set up.
This is a legacy feature that is no longer maintained.
Applying a DNS mask to your content creates a unified and professional brand experience for your viewers. A DNS mask allows you to hide (mask) JWP's content domain or Showcase domain with your own domain.
When applied to your property, your DNS mask domain is applied to the following content:
- Player embeds
- Preview thumbnails
- RSS feeds
- Video downloads
- Showcase implementations
Add a new DNS record for masking
Before you can apply a DNS mask domain to content within a property, you must have at least one hostname (subdomain) associated with that property.

Use the following steps to add a domain to a property:
- From the Properties list page, click the property name > DNS Masking tab.
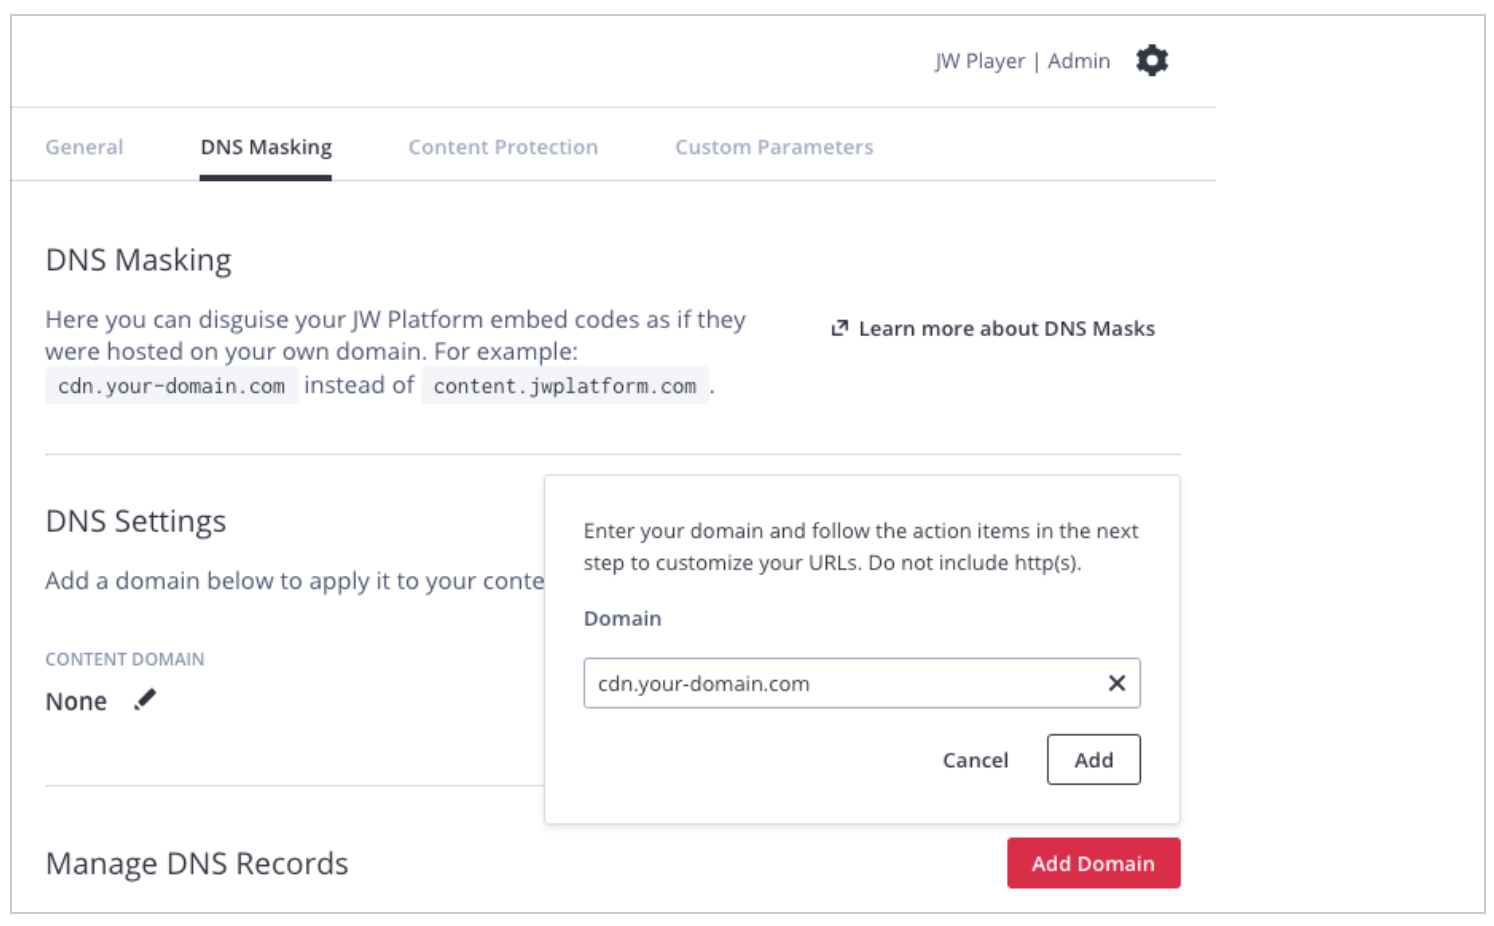
- In the Manage DNS Records section, click Add Domain. A popup window appears.
- Enter a subdomain name, such as cdn.your-domain.com.
If the subdomain exists within the JWP database or within Amazon Cloudfront, you will receive an error and will need to enter a new subdomain.
Be sure to enter a subdomain. You cannot create a CNAME record for a top-level domain, such as your-domain.com.
- Click Add. The DNS Records Details panel appears and displays the SSL certificate creation progress. Once the SSL certificate has been created, a validation record is displayed.
_ad74e38e459d6dfc79a0103967130b46.cdn.your-domain.com.
CNAME _7bc784346fa8aaac31e068fd04f912a1.dxhlbxbsbv.acm-validations.aws.
Creating an SSL certificate can take up to 30 minutes. If an error occurs, a message is displayed in this panel. - In your DNS provider's settings, create a CNAME record for the validation record. Use the first line of the JWP dashboard validation record for the Host Record*. Use the last line of the JWP dashboard validation record for the Points To*.
*The actual name of these fields may differ in your DNS provider's tools and you may not need to include the subdomain in the value. Refer to your DNS provider's documentation for guidance.
Host Record: _ad74e38e459d6dfc79a0103967130b46.cdn.your-domain.com.
Points To: _7bc784346fa8aaac31e068fd04f912a1.dxhlbxbsbv.acm-validations.aws.
The SSL certificate expires after 72 hours. If you have not added the SSL certificate within 72 hours, you will need to generate a new SSL certificate.
- From your JWP dashboard on the DNS Record Details tab, copy the DOMAIN and CNAME.
- In your DNS provider settings, create a new CNAME record to set DNS masking:
• Use the DOMAIN from your JWP dashboard for the Host Record.
• Use the CNAME from your JWP dashboard for the Points To.
Host Record: cdn.your-domain.com
Points To: a1b23cd4.cdn.jwplayer.com - In your JWP dashboard, Close the DNS Record Details tab.
Now that you have created a new record, you can apply the DNS mask domain to your content or Showcase.
Enable DNS masking for property content
After you have created a DNS record, you can enable DNS masking all the content in a property.
If you do not have an existing DNS mask domain associated with your account, you must add a new DNS record.

Use the following steps to enable DNS masking for content in a property:
- From the Properties list page, click the property name > DNS Masking tab.
- In the DNS Setting section, next to Content Domain or Showcase Domain, click the pencil icon. A dropdown menu appears.
- Select a hostname from the list.
- Click Save.
Your video content will now be accessible from the hostname that you specified.
Delete an existing DNS record
If you need to change a DNS mask domain, you must delete the existing DNS record and add a new DNS record. You may remove any DNS record that is not actively used as either a Content Domain or Showcase Domain.
Any hyperlinks, videos, or embeds referencing a deleted DNS record will break. Be sure to update these references prior to removing the DNS record. Removing a DNS record cannot be undone.

- From the Properties list page, click the property name > DNS Masking tab.
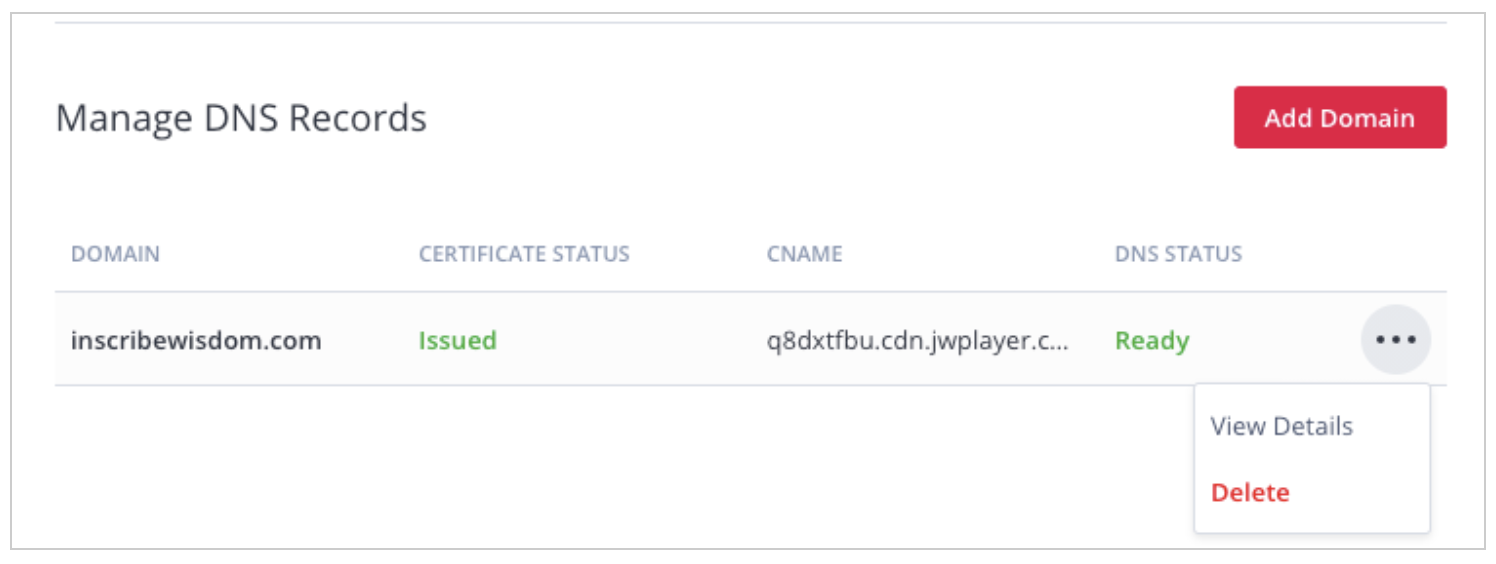
- In the Manage DNS Records section, hover over the domain name you want to delete. The More menu (⋯) appears.
- Click the ⋯ > Delete.
Updated about 2 months ago


