
Condition Groups
Learn how to create a condition group
Condition groups allow you to create a series of branches through which visitor traffic is directed. Each branch contains a set of criteria (conditions).
Branches are executed sequentially in the order listed on the page. Visitors follow the first branch in which they meet all the conditions. If visitor traffic does not meet the conditions for any of the branches, it defaults to the All Other Visits branch of the decision tree.
Define a condition group
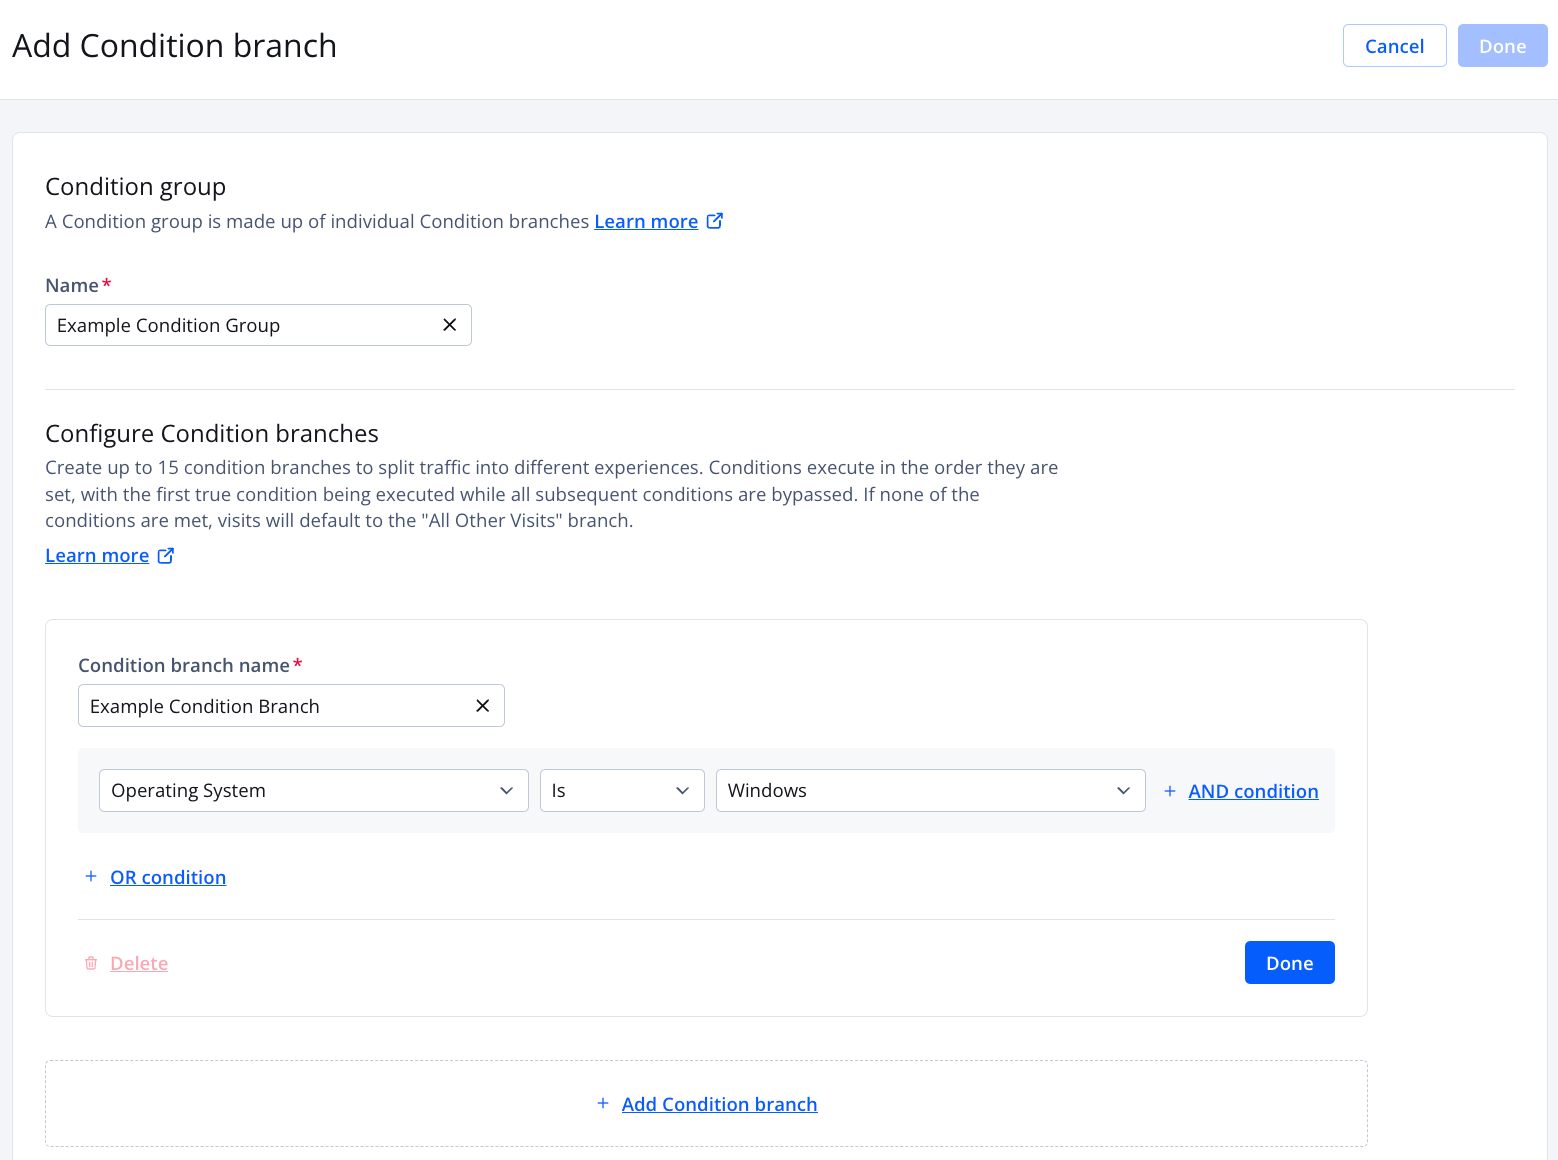
Add Condition branch page
Follow these steps to create a condition group:
-
On the strategy tree, click
 > Condition Group. The Add Condition branch page appears.
 -
Under Condition group, enter a Name.
-
Under Configure Condition branches, enter a Condition branch name.
-
Define a condition for the branch.
-
(Optional) Add another condition to the branch:
- Click + AND condition or + OR condition. A new condition row appears.
Option Description + AND condition Joins multiple rules together using ANDlogic exclusively, requiring all conditions to be satisfied together+ OR condition Joins multiple groups together using ORlogic exclusively, requiring the conditions of at least one group to be satisfied - Repeat step 4 to add another condition.
- Click + AND condition or + OR condition. A new condition row appears.
-
Click Done to save the branch conditions.
-
(Optional) Add another branch to the condition group:
-
Click + Add Condition branch. A new condition branch card appears.
-
Repeat steps 3-6 to add another branch.
Be mindful of the following:
- You can create a maximum of 14 branches.
- When multiple branches are added, each branch is evaluated in the order in which it is listed.
- To reorder branches, click and hold ⋮⋮ to drag and drop the branches.
-
-
Click Done at the page level to save the condition group settings. The strategy tree appears with the condition group added.
The condition group will have a default branch named All Other Visits. This branch addresses situations that to do not meet any of the criteria of the other condition branches within the condition group.
Condition Reference
Geography
JWX gathers geographical data by analyzing a viewer's internet connection through its Global Content Delivery Network (CDN). This method is not always accurate.
The precision of location data can vary depending on the internet connection’s characteristics. Inaccurate location may occur during the following cases:
- VPNs. If a viewer employs a VPN, JWX’s CDN will identify the location of the VPN server rather than the viewer’s actual geography.
- Mobile devices. As determined by a service provider’s traffic management, mobile internet users may appear in a general area rather than a precise location.
| Type | Description |
|---|---|
| Country | Follow the steps to set the visit condition:
|
| Region | Larger economic or geographic area containing multiple countries, such as EMEA, EU, and LATAM Follow the steps to set the visit condition:
|
| Subdivision | Canadian province or US state Follow the steps to set the visit condition:
|
Custom
| Type | Description |
|---|---|
| Key Value Pair | Custom data added for a specific placement Follow the steps to set the visit condition:
|
Device
| Type | Description |
|---|---|
| Operating System | Follow the steps to set the visit condition:
|
| Device Type | Category of devices based on primary form factor and use case, such as desktop and phone Follow the steps to set the visit condition:
|
Browser
| Type | Description |
|---|---|
| Browser | Application used to access and interact with websites and online content, such as Chrome, Facebook, Google Search App, and Roku Follow the steps to set the visit condition:
|
Page Details
| Type | Description |
|---|---|
| Page Domain | Follow the steps to set the visit condition:
|
| Page URL | Follow the steps to set the visit condition:
|
| Page URL Query Params | Follow the steps to set the visit condition:
|
| Referrer URL | Follow the steps to set the visit condition:
|
Local Date/Time
| Type | Description |
|---|---|
| Day of Month | Follow the steps to set the visit condition:
|
| Day of Week | Follow the steps to set the visit condition:
|
| Hour | Follow the steps to set the visit condition:
|
| Local Date | Follow the steps to set the visit condition:
|
| Minute | Follow the steps to set the visit condition:
|
| Month of Year | Follow the steps to set the visit condition:
|
| Year | Follow the steps to set the visit condition:
|
UTC Date/Time
| Type | Description |
|---|---|
| Day of Month | Follow the steps to set the visit condition:
|
| Day of Week | Follow the steps to set the visit condition:
|
| Hour | Follow the steps to set the visit condition:
|
| Local Date | Follow the steps to set the visit condition:
|
| Minute | Follow the steps to set the visit condition:
|
| Month of Year | Follow the steps to set the visit condition:
|
| UTC Date | Follow the steps to set the visit condition:
|
| Year | Follow the steps to set the visit condition:
|
Updated about 1 month ago