Upload videos
Learn how to upload or register your content to your JWP account.
Adding videos to your Media Library allows you to manage those videos in one location:
- Sharing your videos on social media channels
- Adding videos to playlists
- Recommending videos to increase viewer loyalty
- Inserting contextually relevant videos into articles
- Monetizing your videos through advertising
- Analyzing and optimizing video performance
The following sections explain how to upload and register your videos. You can also use an MRSS feed to upload and register your videos to your account.
If you are a developer or have developer resources, you can use the Management API to upload videos to your account.
You can also use the following recipes:
- Direct Single Upload via S3 (file size limit: <5GB)
- Fetch Upload via URL (file size limit: <100GB)
- Multipart Resumable Upload (file size limit: 100MB - 100GB)
Upload a video
Upload media page for all users
A video must have a duration of at least two seconds to be uploaded to the JW Platform.
When uploading a video, your JWX dashboard displays different upload flows depending on whether you have added content types to your property.
The process below accounts for both users who have added content types and users who have not.
Follow these steps to upload a video (≤100GB) through the dashboard:
- Prepare your video.
- From the Media library, click Upload media. The Upload media page appears.
You can also click Upload media from the dashboard home page.
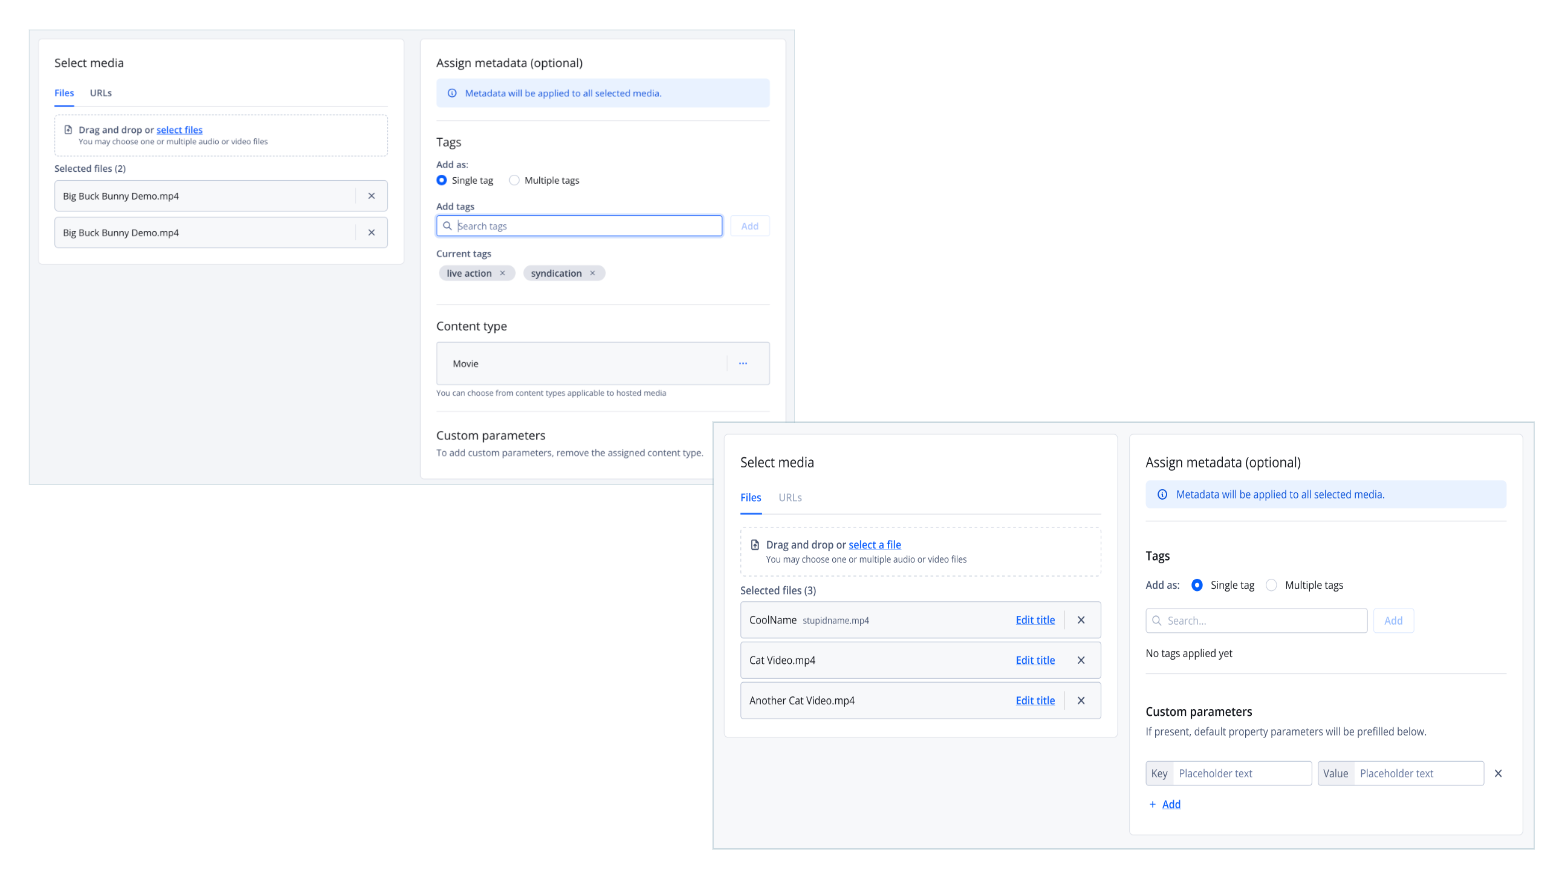
- Select media to upload. You may use either or both of the upload options below.
Option Description Files Media file prepared for upload
Uploading a media file to the JW Platform automatically hosts and registers the media item.
Follow this step to select one or more files:- On the Files tab, drag and drop a file from your computer onto the page. Alternatively, click select files, and choose a video from your computer file list. The selected media files appear in the list view.
URLs Media URL prepared for upload
Follow these steps to enter one or more URLs:- On the URLs tab, enter a list of media URLs, with one URL per line. You can add a maximum of 100 URLs at a time.
- Select a Media hosting option:
- Host and register on JW Platform. (Recommended) Uploads and registers each video to your account. You can share, edit (including video length, captions, metadata), recommend, monetize, and analyze each video.
- Register only. Registers each video with your account. You can share, edit video metadata, recommend, and analyze each video. This option limits access to JWX data products and features. Videos using this option are not subject to monthly storage or streaming limits. Use this option if you would like to deliver VOD media with CEA 608/708 captions.
- Custom renditions. (Requires custom renditions entitlement) Allows you to upload video, audio, and text files that you have already transcoded to meet your own quality, bitrate, or format standards. If you select Custom renditions, learn how to create a custom renditions media item.
- (Optional) Edit the media title.
- (Optional) Add Tags to the media.
- (Optional for users with content types) Select a Content type for the media from the dropdown menu. You can only select content types applicable to the media.
- (Optional for all users) Add Custom parameters to the media.
If working with content types and custom parameters, see this FAQ.
- (Optional for users of a DRM-enabled property) Under Content protection, toggle Digital Rights Management (DRM) to OFF. By default, DRM is applied (ON) to all media uploaded to a DRM-enabled property.
DRM is only available for media items that are hosted and registered on the JW Platform. If you register but do not host the media, DRM does not automatically apply. Learn more about exceptions and externally hosted DRM.
- Click Upload. The Upload media page closes, and the inline Uploading media items panel appears. This panel allows you to continue navigating the dashboard, track upload progress, and cancel your uploads.
When a selected media item has been uploaded, its Media ID will appear in the panel. If needed, you can copy the Media ID from this location.
After your video content has been uploaded, you can add more metadata.
Edit the media title
You can edit the title of a media file or URL during upload.
Follow these steps to edit the title:
- In the media tile, click Edit title. The Edit title popup appears.
- Click X to clear the default title or click directly into the text field.
- Enter a new Media title.
- Click Save.
- (Multiple uploads) Repeat steps 1-4 to edit another title.
FAQs
Can I add custom parameters and content types to uploading media?
When working with content types and custom parameters, be mindful of the following information.
| At Upload | You can assign either a content type or media-level custom parameters. Property-level default custom parameters are removed when a content type is assigned at initial upload. When a content type is assigned, the default parameters defined in the content type schema will be applied. |
| After Upload | Both content types and custom parameters can be added or edited. Prefilled default custom parameters can also be edited. |
When will the JW Platform reject uploading files?
The JW Platform will reject file uploads when an incompatible content type has been selected for the media.
The following are common cases when this can occur.
| Upload Option | Incompatible Content Types |
|---|---|
| Files | Default Live
Other / OTT
Custom Custom content type with any of the following set in its schema:
|
| URLs (Host and register on JW Platform) | Default Live
Other / OTT
Custom Custom content type with any of the following set in its schema:
|
| URLs (Register only) | Custom Custom content type with any of the following set in its schema:
|
If you use custom content types, ensure your schema includes “hosting_type”: "hosted" for media files to be hosted on the JW Platform.
What does the Encoding Status mean?
When you begin uploading media to the dashboard, JWX prepares the media to be shared and streamed.
If your uploaded media is successfully processed, it will go through the following statuses:
- Created or Updating
- Processing
- Ready
If there are issues with your uploaded media, it will go through the following statuses:
- Created or Updating
- Failed
Each of the Encoding Statuses is explained in the following table.
| Encoding Status | Description |
|---|---|
| Created | Your media is being uploaded but is not ready for streaming. JWX has created a media asset placeholder. Your video is being uploaded into the media asset placeholder. |
| Failed | JWX is unable to process the media you have uploaded. You may receive this status for one of two common reasons:
|
| Processing | Your media is being prepared to be streamed. JWX is creating multiple quality-level assets from your uploaded media to support the various internet connectivity and viewing environments in which your users may consume your content. |
| Ready | Your can stream the media asset. |
| Updating | Your newly uploaded media file is being prepared to be streamed. This status occurs when you upload a new media file to replace an existing original media in your dashboard. JWX creates multiple quality-level assets from the newly uploaded media file to support the various internet connectivity and viewing environments in which your users may consume your content. While the newly uploaded media file is being prepared, all of the existing assets can be streamed. |
Which IP addresses or domains should I allow on my firewall so my users can access JWP-hosted content?
If your organization maintains a geo-specific Allow list, add the following domains to ensure that videos and related assets from JWX are not blocked:
- .jwpcdn.com
- .jwplayer.com
- .jwplatform.com
- .jwpltx.com
- .jwpsrv.com
- .mux.com
- videos-fms.jwpsrv.com
- videos-cloudflare.jwpsrv.com
To ensure that your viewers have the best video experience, JWX maintains a dynamic and flexible CDN program. Due to the variability and scope of the CDN program, JWX does not provide IP address lists.