Broadcast a live event
After creating an Instant Live Channel and configuring your encoder settings, you can embed and broadcast your live event stream. The following sections explain how to complete these tasks for both an automatic publish and manual publish Instant Live Channel.
If you are a developer or have developer resources, you can use the Platform Management API to set up and broadcast a live stream event with either an automatic publish or manual publish Instant Live Channel.
Embed and broadcast an event
A published live event recording using the same media ID as its live event is streamed at Live Usage minutes rates.
If you plan to publish the recording of a live event for mass distribution, we strongly recommend using the event’s VOD asset in your JW media library. Live2VOD full-video clips are charged at live streaming rates until the VOD media is re-processed and imported to your media library. Once processed, full-video clips are charged at VOD streaming rates. Refer to your contract for rate terms.
Automatic Publish
If you chose the Automatic Publish setting during the channel creation, your live event will start streaming to your viewers once you have started your encoder.
Use the following steps to embed and broadcast your live event stream:
- From the Instant Live Channels page, click the name of the Instant Live Channel.
- Under the preview panel, click Embed. The Embed panel appears.
- From the Select Player dropdown menu, select a player.
- From the Select Type dropdown menu, choose the type of embed.
Type Description Embed Active Event Immediate replay is made available after the event ends Embed Channel Player automatically transitions between the Live Channel idle and active states - Copy the Embed Code.
- Click Close.
- In the location on your page where the live event stream should appear, paste the embed code. You can also embed an active live event stream in a Facebook or YouTube social media post.
- Start your encoder. The live event begins streaming to your viewers.
- When the event has ended, stop your encoder.
After the live event stream has been processed, it appears under Previous Events on the Instant Live channel details page and in the list of media in your Media Library.
Manual Publish
If you chose the Manual Publish setting during the channel creation, you have the ability to preview the live event stream before streaming to your viewers.
Use the following video and steps to embed, preview, and broadcast your live event stream.
- From the Instant Live Channels page, click the name of the Instant Live Channel.
- Under the preview panel, click Embed. The Embed panel appears.
- From the Select Player dropdown menu, select a player.
- From the Select Type dropdown menu, choose the type of embed.
Type Description Embed Channel (Recommended) Player automatically transitions between the Live Channel idle and active states Embed Active Event Immediate replay is made available after the event ends - Copy the Embed Code.
- Click Close.
- In the location on your page where the live event stream should appear, paste the embed code. You can also embed an active live event stream in a Facebook or YouTube social media post.
- Start your encoder. A preview of your live event stream appears only in your JWX dashboard for you to review.
- Click Go Live to stream the live event to your viewers.
- When the event has ended, stop your encoder.
After the live event stream has been processed, it appears under Previous Events on the Instant Live channel details page and in the list of media in your Media Library.
To start another live event stream on the same Instant Live channel, follow steps 8-10 in the steps above.
Once you have started your live event stream, you can add metadata that will be added to the video that is created after your event ends. Under Previous Events, click the first listed item. When the video details page appears, you can edit any of the metadata fields.
Manage the availability of a channel
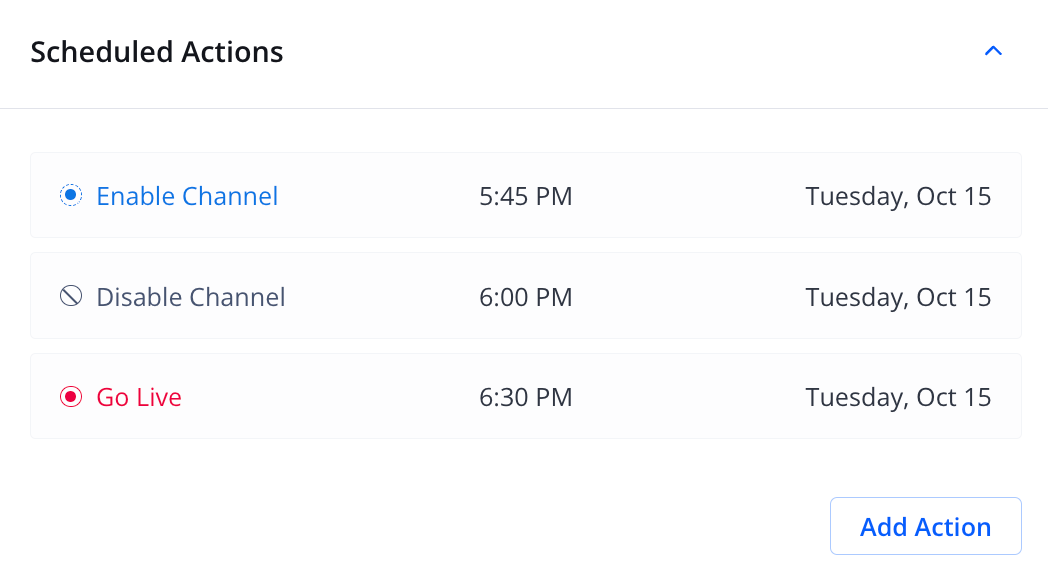
Scheduled Actions section
If you do not have easy access to turn your encoder on and off, you can control the live event stream by managing the channel availability. When a channel is created, it is enabled by default.
Use the following steps to manage the availability of a channel from your JWX dashboard:
- From the Instant Live Channels page, click the name of the Instant Live channel. The channel details page appears.
- Under the preview panel, expand Scheduled Actions.
- Click Add Action. The Schedule an Action popup window appears.
- From the dropdown menu, select an Action.
Action Description Enable Channel Allows encoders to connect to your channel Go Live Publishes your stream Disable Channel Disables your channel so encoders can no longer connect to it - Set the Date.
- Set the Local time.
- Click Schedule. The popup window closes. The action will be listed in chronological order under Scheduled Actions.
FAQs
How do I stop a stream after a live event has ended?
Stop the stream from your encoder.
At which rate are replays of a Live Channels event stream billed?
When you have ended a Live Channels event stream, JWX imports the video of the event stream into your account and transcodes the imported video. (The imported video retains the same media ID as the Live Channels event stream media ID.) The state of the transcoding and importing processes determines the rate at which you are charged:
- If a viewer replays the video during the importing and transcoding processes, you are billed at Live Usage minute rates.
- If the viewer replays the video after the importing and transcoding processes have completed, you are billed at VOD Streaming rates.
To reduce your streaming costs, we suggest you create a Media Available Zap or a webhook to notify you when the importing and transcoding processes have completed.