Content Experiences
A content experience allows you to configure player options, customize player appearance, and select content to be displayed to the visitor.
Define a content experience
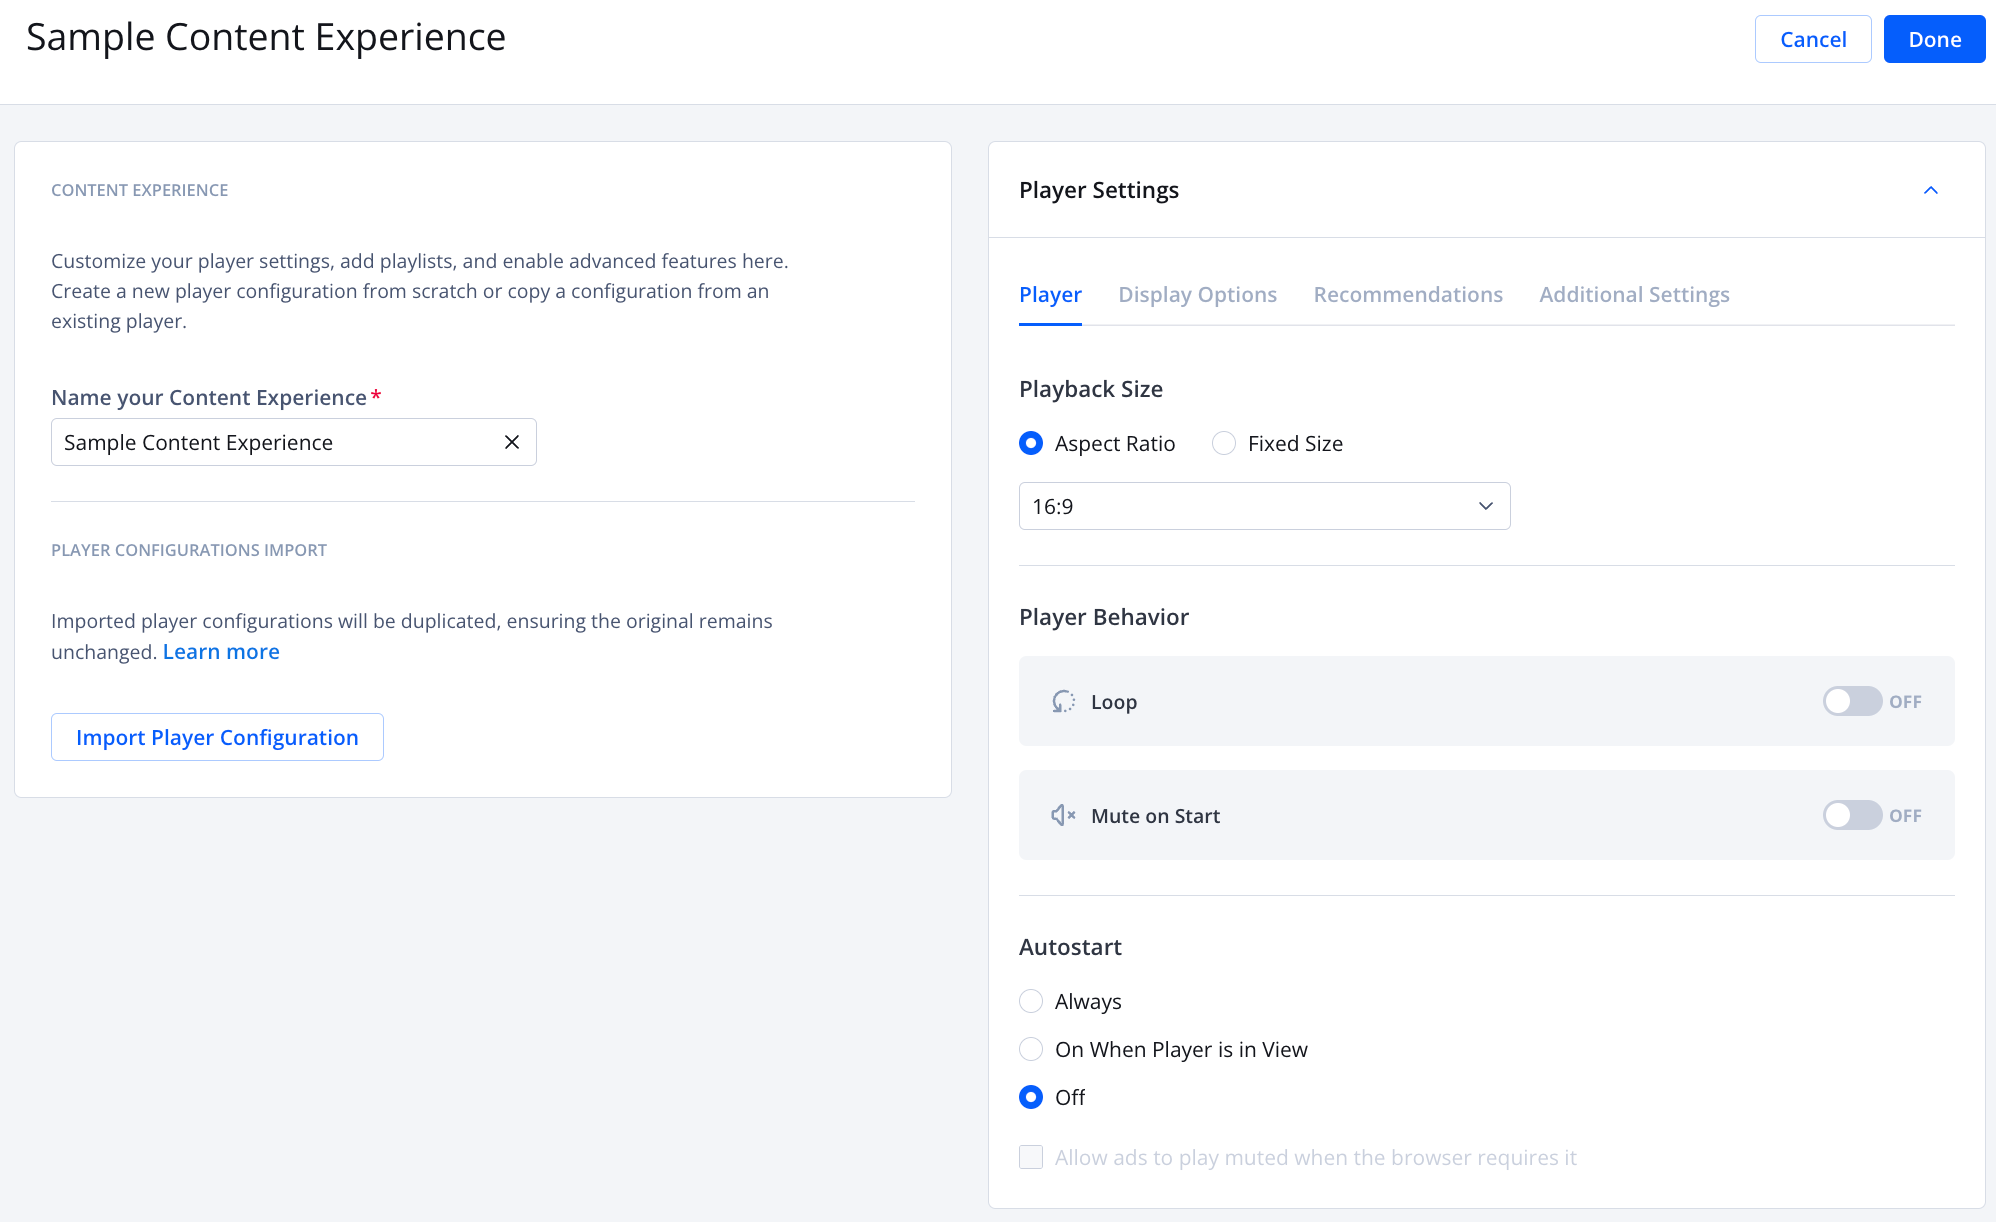
Content Experience details page
Use the following steps to create a content experience:
- On the strategy tree, click +Add Experience > Content Experience. The content experience details page appears.
- Under Content Experience, enter a name in the Name your Experience field.
- (Optional) Expand the Player Settings section and configure the settings on the four tabs:
- Player
- Display Options
- Recommendations
- Additional Settings
As an alternative, you can copy the settings of an existing player:
- Under Player Configurations Import, click Import Player Configuration. The Import Player Configurations panel appears.
- Select the player configuration to import.
- Click Import. The settings of the player populate the tabs of the Player Settings section.
If you make changes to the existing player in the future that you want reflected in the strategy, you must repeat the previous steps.
- Expand the Playlist Settings section.
- Use the following table to define the playlist settings.
Item Description Playlist or Single Media Playlist or single media to play to the viewer
Single Media
Follow these steps to define a single media- For the Type, choose Single Media.
- From the dropdown menu, select a media item.
- (Optional) Select Use a Key for media if available and enter a key for custom data in the field that appears.
Playlist
Follow these steps to define a playlist- For the Type, choose Playlist.
- From the dropdown menu, select a playlist.
- (Optional) Select Use a Key for playlist if available and enter a key for custom data in the field that appears.
Playlist URL
Follow these steps to define a playlist- For the Type, choose Playlist.
- In the text field, enter the URL for a playlist.
- In the Use a Key for playlist URL if available text field, enter a key for custom data in the field that appears.
Advanced Content Curation (Optional) Media pinned to a playlist position
Follow these steps to pin media:- Choose a Type:
- Single Media
- Playlist
- None (Default)
- (Single Media, Playlist) Choose the media to display through one of the following approaches:
- Select Use a Key Value Pair and enter a key for custom data in the field that appears.
- Select a media item or playlist from the dropdown menu.
- To curate more content, click + Subsequent Play and repeat steps i-ii.
- Click Done. The experience appears on the decision tree.
- Click Save.
Player
Playback Size
- Under Playback Size, click the Aspect Ratio or Fixed Size radio button to configure the dimensions of the player.
- Choose the aspect ratio from the dropdown (Aspect Ratio) or set the player dimensions in pixels (Fixed Size).
When Aspect Ratio is selected you have the option to use the icons above the player preview to toggle between Desktop, Mobile-Portrait, and Mobile-Landscape. When Fixed is selected, the preview player appears with the dimensions that have been set.
Player Behavior
The Player Behavior section allows you to configure the behavior of the player. The following table explains each display option.
| Option | Description |
|---|---|
| Loop | Automatically repeats video content. This will only work for single videos. Videos within playlists do not loop. Toggle ON to loop the video in the player. The default is OFF. |
| Mute on Start | Starts playback with video muted Example use case: Use when viewers watch your content on a mobile device and On Always or On When Player is in View is selected for Autostart. Toggle ON to keep the video muted when played. The default is OFF. |
Autostart
The Autostart section allows you to configure the autostart behavior of the player and to decide when or if autostart is available.
The following table explains each autostart option.
| Option | Description |
|---|---|
| On Always | Playback automatically begins when the page is loaded |
| On When Player is in View | Playback automatically begins when more than 50% of the player is viewable |
| Off | Playback does not automatically start when the page is loaded |
The majority of modern browsers force autostarted content to begin playing with muted audio. JWX cannot override this, as muted audio is enforced by browsers, not from within the player.
It is important to note that in most cases a viewer must interact with the player to enable sound once autostart begins. This may not be an optimal user experience if unmuted audio is desired as soon as the media plays.
The table below provides detailed information about each browser’s audio and general autostart policies.
| Browser | Sound Default | Policies |
|---|---|---|
| Chrome | Muted | Autoplay with sound is allowed when:
|
| Firefox | Muted | Firefox blocks all media with sound from playing automatically, by default. If users want a website to automatically play media or to make other changes to their autoplay settings, they can use one of these methods. |
| Safari | Muted | Safari uses an automatic inference engine to block media elements with sound from auto-playing by default on most websites. The settings menu gives users control over which websites are allowed to auto-play video and audio. |
Enable muted ads
Under the the Autostart radio buttons is a final checkbox: Allow ads to play muted when the browser requires it. Click this check the checkbox to enable muted ads.
Some browsers require ads to be initially muted when video playback starts automatically. This browser requirement improves the user experience if the viewer is not expecting sound or if the player is not immediately in view. This option is only available when On Always or On When Player is in View is selected for the Autostart option.
Display Options
The Display Options section allow you to control how much information is displayed or to turn off controls entirely to create a chromeless web player.
| Option | Description |
|---|---|
| Title | Controls display of the video title. The toggle is set to ON by default and displays the title. To disable the video title display, click the toggle to OFF. |
| Description | Controls display of the video description The toggle is set to ON by default and displays the description. To disable the video title display, click the toggle to OFF. |
| Controls | Controls display of the video controls:
|
Recommendations
Recommendations automates the generation of a playlist based on the currently-watched video and provides you options to customize the appearance and behavior of that playlist.
Follow these steps to set up Recommendations:
- Click the toggle to turn ON the Recommendations features.
- (Optional) From the Recommendations Playlist dropdown menu, select a playlist. If you do not have additional playlists listed or prefer not to choose a playlist, the Default Recommendations Feed will be used. NOTE: A recommendations playlist can be associated with multiple players.
- (Optional) Click the Use a Key Value Pair checkbox to use the value of an on-page key (custom data) to identify the playlist. A textbox appears.
- Enter the on-page key.
- (Optional) From the Auto-advance to next video after dropdown menu, choose when to autoplay the next video.
- (Optional) Click the Display Custom Text checkbox and enter a message. Read the following Countdown Overlay section to learn more about this message.
- (Optional) Update the Display Title.
- Select the Display Mode.
Additional Settings
The Additional Settings tab provides a variety of additional player options to further enhance usability and SEO viability.
| Features | Description |
|---|---|
| Float on Scroll | When selected, the player remains visible when the original player location is scrolled out of view by minimizing it to a corner of the screen. On devices in portrait orientation, the player becomes fixed to the top of the page using its original dimensions. When floating, the viewer can drag the player to reposition it. This functionality is disabled during ad playback. Float on scroll cannot be used with a player that is embedded in an iframe. |
| Picture in Picture | When this option is selected picture-in-picture becomes available to the user so that the player video continues to play and display while on top of other content on the device. |
| Pause if Offscreen | When this option is selected, video playback pauses when the player is no longer viewable. Playback resumes when the player becomes viewable again. If the player is no longer viewable after an ad break begins, the ad break will continue to play to completion before pausing. |
| Google Analytics | In addition to the video analytics and insights provided by JWX, you can enable direct integration with Google Analytics. Follow the steps below to enable and integrate with Google Analytics: 1. Click the toggle to ON to enable tracking playback events using Google Analytics. 2. Set up Google Analytics.If you are a developer, you can also send events with Google Analytics to your analytics platform. |
| Google Search Optimized | When this option is enabled, Google Search Optimization is enabled. |
| Casting | When this option is enabled, a viewer can stream the video using Chromecast (Chrome) or Airplay (Safari). |
| Playback Speed | Enables a menu that allows the viewer to adjust playback speed The predefined options available in the menu are 0.5x, 1x, 1.25x, 1.5x, and 2x. NOTE: For mobile web, adjusting the playback rate is not currently supported on Android devices with HLS streams. |
Keep Watching Player
The Keep Watching Player feature helps viewers discover new content by switching videos when a user isn’t engaged and opens up additional ad opportunities.
When a JWX video player loads with the Keep Watching feature enabled, it checks for user engagement, such as button clicks on the player or keyboard shortcut usage. If any engagement is detected, the player does not display the Keep Watching overlay.
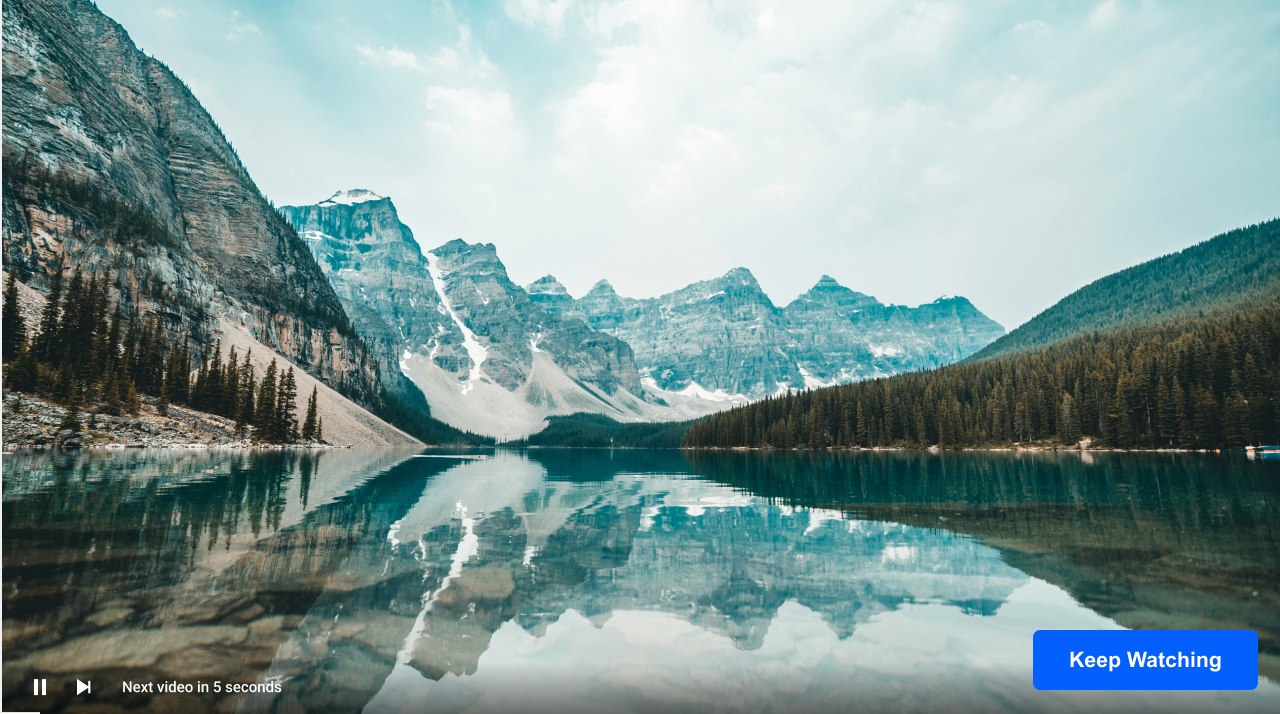
If the user has not engaged with the content, a countdown (Countdown appearance at start time) and the Keep Watching button appear. During the countdown (Countdown duration), the viewer can click the Keep Watching button to continue watching the current video. If the viewer does not click the button, the player will automatically advance to the following video and reset the engagement signal to assess the engagement of the viewer.
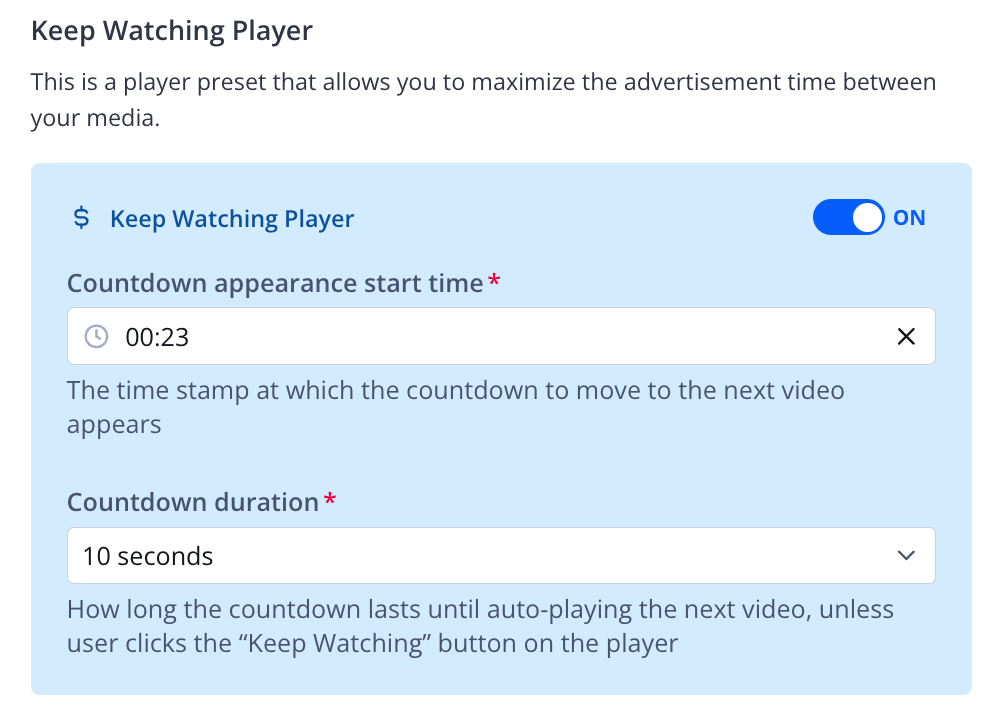
Follow these steps to enable this feature:
- Click the toggle to ON. The Keep Watching Player settings appear.
- Enter the Countdown appearance start time in MM:SS format.
The minimum appearance start time is 00:23.
- From the Countdown duration dropdown menu, select a duration.
Player loading behavior
Player loading behavior allows you to determine when the player loads on the page.
Media Preloading
Media Preloading allows the video preloading setting to be configured. When a portion of a video is preloaded, the time is reduced between a viewer clicking the play button and the beginning of playback.
| Options | Description |
|---|---|
| None | Configures the player to begin loading media only after the viewer clicks the play button. The viewer may experience a delayed start to video playback. No additional bandwidth is used to load media. |
| Quick start (default) | Configures a single player to begin loading the metadata for the video and up to one segment of the video. If additional players are embedded on the same page, each player will preload content when more than 50% of the player is viewable. |
| High-quality | Configures a single player to begin loading up to the first 30 seconds of the video content. If additional players are embedded on the same page, each player will preload content when more than 50% of the player is viewable. |
Default Bandwidth Estimate
Default Bandwidth Estimate (Optional) allows you to define an estimate of your viewer's connection type. When defined, the player may attempt to start playback at a higher quality.
Updated over 1 year ago