Add content to the landing page
Learn how to add and organize content on an app landing page
The landing page of an app is organized by shelves that highlight the most relevant videos to a viewer.

Landing page of an app
Each shelf is a curated subset of the app's content, organized editorially by fields like popularity, genre, or publication date. Example shelves can include the following:
- New Action Movies
- What's Trending
- Award Winners
- Recently Added
You can also use sort and filter features to construct the content on these shelves.
Add a shelf
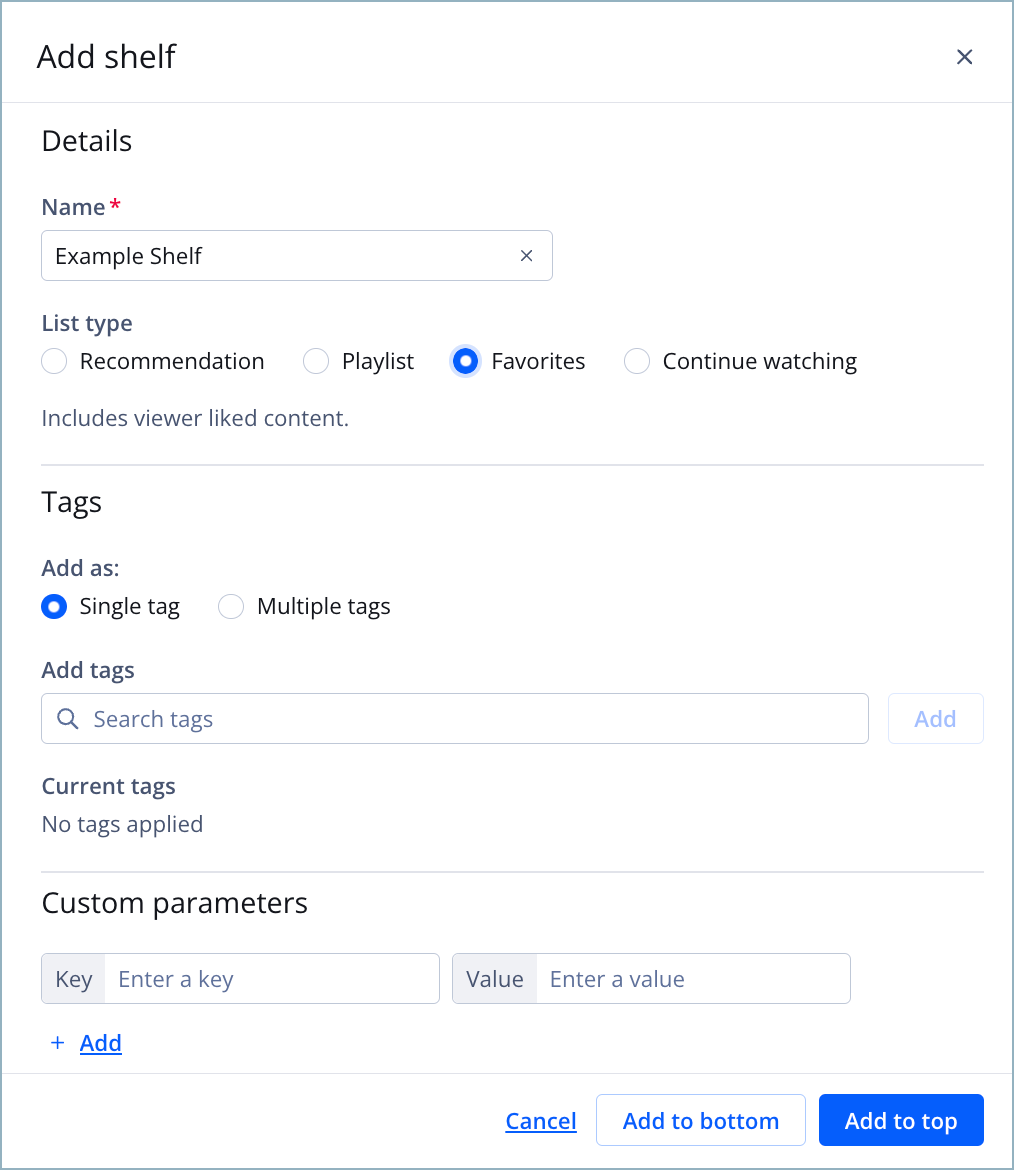
Add shelf panel
Follow these steps to add a shelf to the landing page:
-
From the Apps page, select an app config. The settings for the app config appear.
-
On the Landing page tab, click + Add shelf. The Add shelf panel appears.
-
Enter a unique Name. This name will identify the shelf on the app landing page.
-
Select a List type for the shelf.
Depending on your dashboard entitlements, some shelf types may not be available. For more information, please contact your JWX representative.
Option Description Recommendation The recommendation shelf dynamically displays videos based on selected media tags and custom parameters, and sorts them by popularity, determined by the number of plays. This shelf updates daily and is accessible across all your app platforms.
You can have multiple recommendation shelves.
Follow these steps to enable a recommendation shelf:- Click Recommendation. A dropdown menu appears with your recommendation lists.
NOTE: You can create and manage recommendation lists on the Add Recommendations page. - Select a recommendation list for the shelf.
- Select a recommendation list for the shelf.
Playlist The playlist shelf displays a playlist that you select, allowing viewers to access curated collections of videos. When registered viewers log in, they can access your playlist shelves across all your app platforms.
You can have multiple playlist shelves.
Follow these steps to enable a playlist shelf:- Click Playlist.
- From the Select playlist dropdown menu, choose a playlist to associate with the shelf. The playlist items will appear as clickable media on the shelf.
NOTE: You can create and manage playlists on the Add Playlists page.
Favorites The favorites shelf displays all the videos that a viewer has saved to watch later. When registered viewers log in, they can access their favorites shelves across all your app platforms.
Like other shelves, you can assign a unique name to each favorites shelf.
You can have multiple favorites shelves.
Follow this step to enable a favorites shelf:- Click Favorites.
Continue watching You can display a continue watching shelf on the landing page to list recent, partially-watched videos for viewers with a viewing history. When registered viewers log in, they can access their continue watching shelves across all your app platforms.
Like other shelves, you can assign a unique name to each continue watching shelf.
You can have multiple continue watching shelves.
Follow this step to enable a continue watching shelf:- Click Continue watching.
- Click Recommendation. A dropdown menu appears with your recommendation lists.
-
(Optional) Under Labels, enter a label name to associate with the shelf.
-
Click Add.
-
(Optional) Add Custom parameters.
When retrieving custom parameters via the Delivery API, snake case (enable_sharing) is automatically converted to camel case (enableSharing). Be sure to use the camel case format when referencing these parameters in your implementation.
-
Click Add to top or Add to bottom. The shelf appears in the chosen position on the Landing page tab.
Each shelf displays a poster image for several media items in the playlist. You can drag and drop a playlist shelf to re-order its position on the landing page.If you have developer resources, you can also configure shelf appearance using the layoutType custom parameter. JWX supports two values out of the box:
- hero: Sets the shelf in first position at the top of the page
- featured: Positions the shelf anywhere on the page
You may add as many shelf appearance variants to your implementation as desired.
-
(Optional) Repeat steps 1-8 to add another shelf.
-
Click Save.
-
(Optional) Click Preview. A new browser tab opens displaying an interactive preview of the app.
After adding one or more shelves to the landing page, you can filter shelves according to their labels.
Filter shelves
Filtering the landing page
You can assign one or more labels to a shelf. On the landing page, these labels appear as dropdown options, allowing viewers to filter shelves.
For example, labels can be used to filter shelves by language, location (such as country or region), or device type (such as web, mobile, or CTV).
The JWX app config lets you preview how label-based filtering will affect your app's landing page. However, this preview is for visualization only and does not change the actual configuration.
To implement label filtering in your app, please contact your partner for assistance.
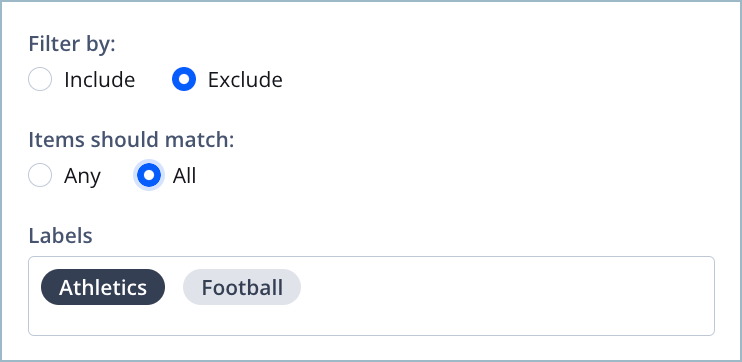
Follow these steps to filter shelves by labels:
- From the Apps page, select an app config. The app config settings appear.
- On the Landing page tab, click Labels. A dropdown menu appears.
- Under Filter by, select the inclusion logic:
- Include: The filter reveals shelves that include the selected labels.
- Exclude: The filter reveals shelves that do not include the selected labels.
- Under Items should match, select a matching option:
- Any: The filter includes shelves that contain at least one of the selected labels.
- All: The filter includes shelves that contain every one of the selected labels.
- Under Labels, select one or more labels associated with the shelf. The settings from steps 3-4 will be applied to shelves with these labels.