Define a client-side ad schedule
Video advertisements allow you to monetize the videos your viewers watch. An ad schedule defines when ads are eligible to appear during video playback.
When creating an ad schedule, you choose how ads are delivered:
- VAST or IMA (third-party ad servers): Ads are requested from an external ad server such as Google Ad Manager, FreeWheel, or other VAST-compatible servers.
- JWX Ad Server: Ads are requested from the JWX Ad Server which runs and auction and returns an ad to play.
Define an ad schedule
Follow these steps to define an ad schedule:
- From the Ad insertion page, on the Ad schedule tab, click Create ad schedule. The ad schedule settings appear.
- Enter a name for the ad schedule:
- Click
 (pencil icon). A text box appears.
 - Enter an ad schedule name.
- Click
- Click a radio button to Select your Ad Client.
- (JWX Ad Server) Select a Placement Type.
JWX supports these IAB placement types.
- Configure ad delivery settings:
- (VAST, Google IMA) Add breaks manually
- (VAST, Google IMA) VMAP
- Dynamic Ads
- (VAST, Google IMA - Optional) Enable Player bidding.
- Click Save.
Ad delivery settings
You can define your ad delivery settings through one of the following approaches.
Add breaks manually
A manual ad schedule defines how ad breaks are explicitly placed within your video content.
By manually inserting ad breaks and configuring ad rules, timing, and bidding settings, you control when ads are eligible to play during playback.
Configure ad breaks for VAST
Follow these steps to configure ad breaks:
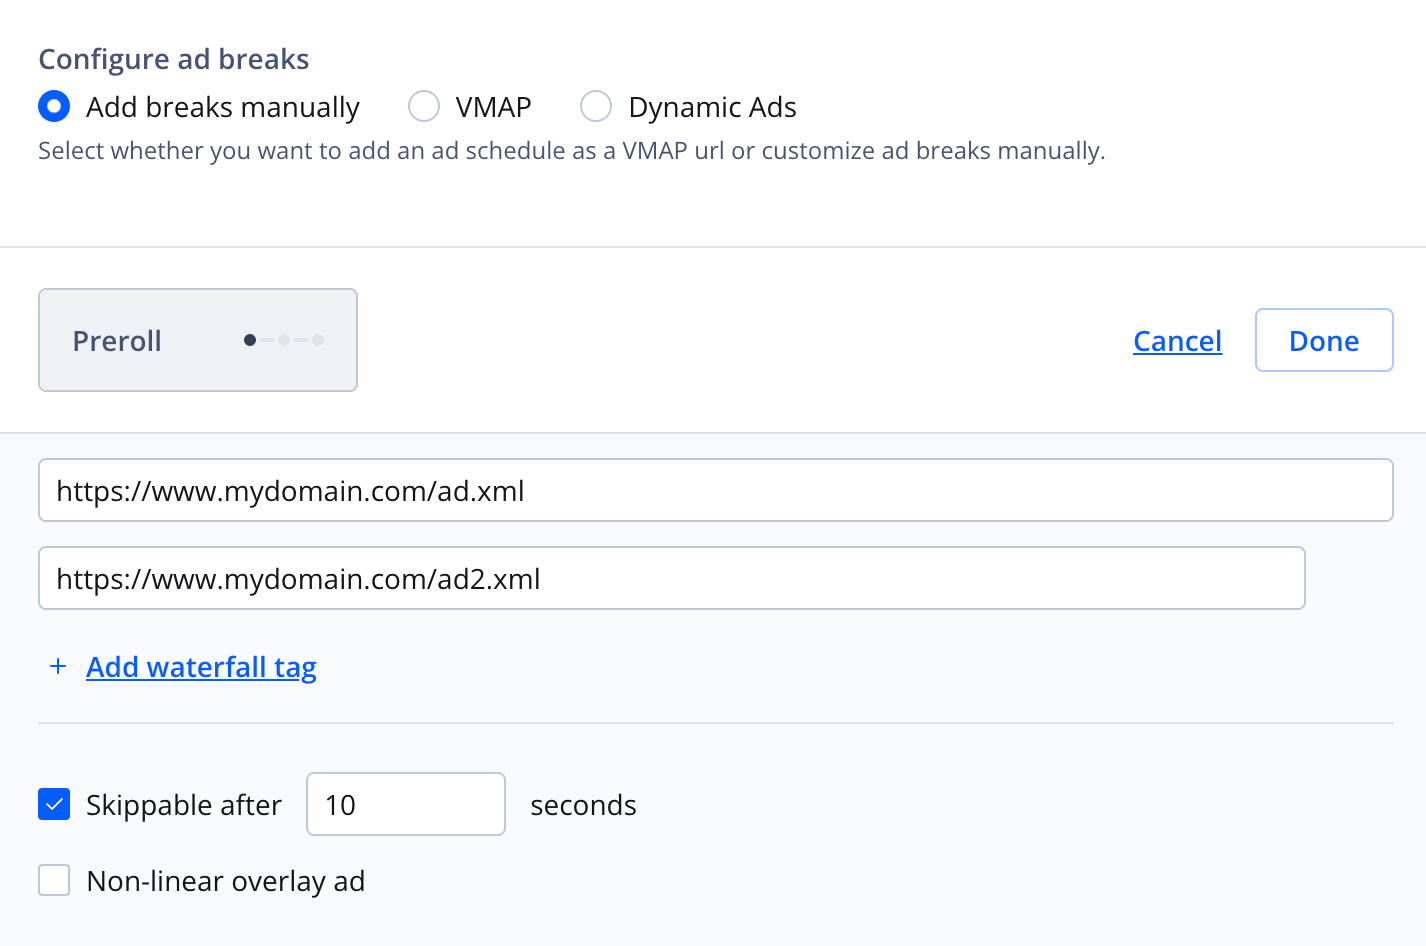
- Under Configure ad breaks, choose Add breaks manually.
- (Google IMA) Select a VPAID Mode for the ad.
VPAID Mode Description Insecure Loads in a friendly iFrame
This allows the ad access to the site via JavaScript.Secure Enabled using a cross domain iFrame
VPAID ads cannot access the site. A VPAID ad that depends on friendly iFrame access may not play.Disabled No ad
VPAID ads will not play. An error will be returned if a VPAID ad is requested.
- Click + (plus icon) to create a Preroll, Midroll, or Postroll ad break. A configuration panel appears.
- Enter an Ad tag URL.
Macros can be added to each ad tag to target the ads returned. These macros are replaced in real time. It is common to add 10+ macros to a single ad tag.
- (VAST - Optional) Click + Add waterfall tag to enter an additional Ad tag URL.
Creating an ad tag waterfall helps you to maximize ad revenue by attempting to show a valid ad to your viewers during an ad break.
- (VAST - Optional) To increase viewer engagement, click Skippable after ___ seconds and enter the length of time in seconds a viewer must watch an ad before having the ability to skip the ad.
- (Optional) Click Non-linear overlay ad to allow an ad banner to display over video content without disrupting the video.
- (Midroll) Define the Break timing:
- Select an option from the Break timing dropdown menu.
- Next to the Break timing dropdown menu selection, enter the location in the video where a midroll ad break occurs.
Option Guidance Seconds into video Enter the video location in seconds. Timecode Enter the video location as a timecode in hh:mm:ss.mmm format.
Example: 00:15:25.001% of video Enter the video location as a percentage of the video.
Example: Enter 15 for 15%.
- Click Done.
- (Optional) Repeat steps 3-9 to configure an additional ad break.
- Expand the Advanced ad rules section and set the ad rules.
Rule Description Start on playlist item # Set the playlist item number after which the first ad will appear
Example: If set to 2, the first ad plays before the second video in the playlist.
Learn more about ad frequency rules.Repeat on interval Set how many playlist items must be viewed before another ad is shown
Example: If set to 3, an ad plays before every third video in the playlist.
Learn more about ad frequency rules.Time between ads (VAST) Set the minimum elapsed clock time (in seconds) required between ads during playback
Example: If set to 300 seconds (5 minutes), an ad will not play until at least 5 minutes have passed since the previous ad was watched.
Learn more about long-form ad engagement rules.Ad seen on subsequent visit (VAST) Set whether a pre-roll is shown when a viewer resumes a partially-watched video
Example: If enabled, a pre-roll ad will play when the viewer returns, before playback resumes at their previous point.
Learn more about long-form ad engagement rules.
⤴️ Return to step 6 of the main process.
VMAP
A VMAP ad schedule defines how ad breaks are scheduled using a VMAP ad tag.
By configuring ad rules, timing, and bidding settings, you control when ads are eligible to play throughout video playback.
Configure ad breaks for Google IMA VMAP
Follow these steps to configure ad breaks:
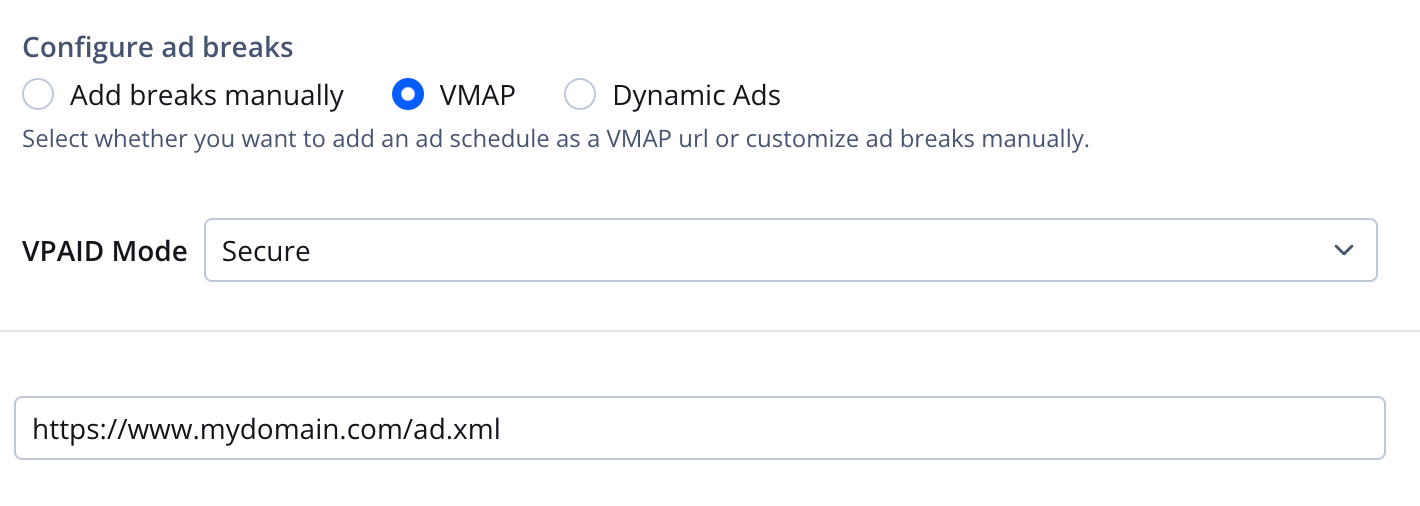
- Under Configure ad breaks, choose VMAP.
- (Google IMA) Select a VPAID Mode for the ad.
VPAID Mode Description Insecure Loads in a friendly iFrame
This allows the ad access to the site via JavaScript.Secure Enabled using a cross domain iFrame
VPAID ads cannot access the site. A VPAID ad that depends on friendly iFrame access may not play.Disabled No ad
VPAID ads will not play. An error will be returned if a VPAID ad is requested.
- Enter an Ad tag URL.
Macros can be added to each ad tag to target the ads returned. These macros are replaced in real time. It is common to add 10+ macros to a single ad tag.
- Expand the Advanced ad rules section and set the ad rules.
Rule Description Start on playlist item # Set the playlist item number after which the first ad will appear
Example: If set to 2, the first ad plays before the second video in the playlist.
Learn more about ad frequency rules.Repeat on interval Set how many playlist items must be viewed before another ad is shown
Example: If set to 3, an ad plays before every third video in the playlist.
Learn more about ad frequency rules.Time between ads (VAST) Set the minimum elapsed clock time (in seconds) required between ads during playback
Example: If set to 300 seconds (5 minutes), an ad will not play until at least 5 minutes have passed since the previous ad was watched.
Learn more about long-form ad engagement rules.Ad seen on subsequent visit (VAST) Set whether a pre-roll is shown when a viewer resumes a partially-watched video
Example: If enabled, a pre-roll ad will play when the viewer returns, before playback resumes at their previous point.
Learn more about long-form ad engagement rules.
⤴️ Return to step 6 of the main process.
Dynamic Ads
A Dynamic Ads schedule defines how ad breaks are scheduled using playback rules that control ad frequency, timing, and eligibility during playback.
This approach allows you to balance monetization and viewer experience without manually placing ad breaks.
Configure ad breaks for Google IMA Dynamic Ads
Key Benefits:
- Tailor the viewing experience with intuitive, non-technical ad rules
- Set ad rules based on customer goals
- Boost monetization through increased opportunities for ad fill and impressions
- Use preset rules to easily align your ad strategy with industry specifications
If you plan to use Dynamic Ads with the Keep Watching Player, read this FAQ.
Follow these steps to configure Dynamic Ads:
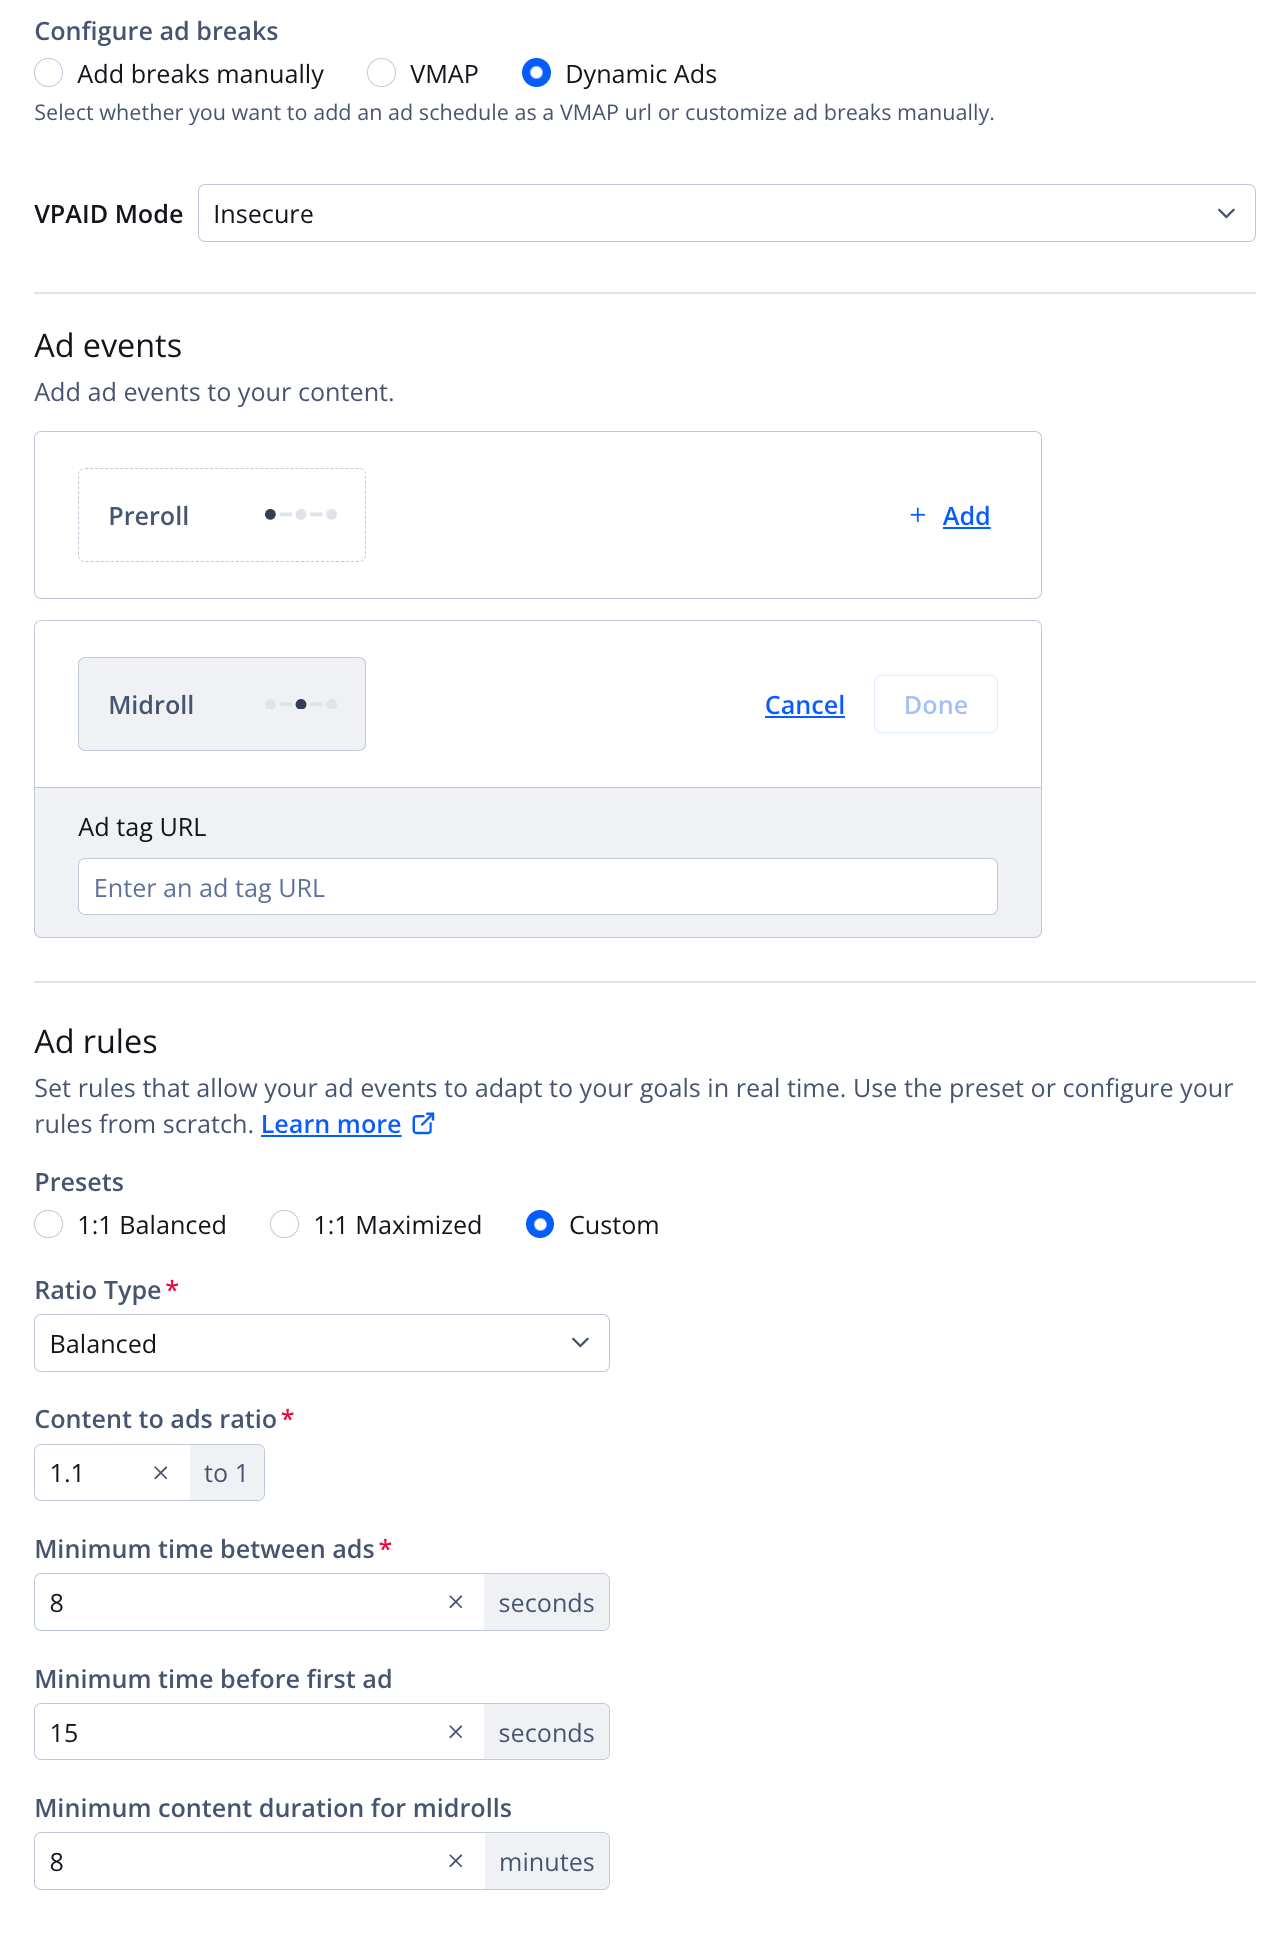
- Under Configure ad breaks, choose Dynamic Ads.
When JWX Ad Server has been chosen, Dynamic Ads is automatically selected and greyed out.
- (Google IMA) Select a VPAID Mode for the ad.
VPAID Mode Description Insecure Loads in a friendly iFrame
This allows the ad to access the site via JavaScript.Secure Enabled using a cross-domain iFrame
VPAID ads cannot access the site. A VPAID ad that depends on friendly iFrame access may not play.Disabled No ad
VPAID ads will not play. An error will be returned if a VPAID ad is requested.
- Add Ad events to your content.
VAST, Google IMA
- Click + Add next to Preroll or Midroll. The configuration panel appears.
- Enter the Ad tag URL.
Macros can be added to each ad tag to target the ads returned. These macros are replaced in real time. It is common to add 10+ macros to a single ad tag.
- Click Done
- (Optional) Repeat steps i-iii to add another ad event.
JWX Ad Server
- Click the toggle to ON for the ad events to enable for your content.
You can enable one or both types of ad events.
- Define Ad rules that allow your ad events to adapt to your goals in real time.
Rule Description Presets Defines how ads are scheduled relative to content
Possible options:1:1 Balanced
Sets ads to appear in real time with content watched, maintaining a continuous one-to-one ratio of ad time to content time
Example: Watching 30 seconds of ads requires at least 30 seconds of content playback before another ad is eligible.1:1 Maximized
Sets ads based on the full duration of the media item, allowing up to a one-to-one ratio of ad time to content time across the entire playback
Example: A 5-minute item can include up to 5 minutes of ads.
NOTE: Ad concentration may vary or be front-loaded.Custom
Enables setting a specific content-to-ads ratioRatio Type (Custom) Defines how the content-to-ads ratio is calculated
This option is automatically set for 1:1 Balanced and 1:1 Maximized, and only selectable when using Custom.
Possible options:- Balanced: Calculates ad eligibility based on content already watched, ensuring the ratio is maintained throughout playback
- Maximized: Calculates ad eligibility across the full duration of the media item, which can result in more ad time than content time if playback is abandoned before completion
Content to ads ratio (Custom) Sets the desired balance of content time to ad time
Example: A 5-to-1 ratio will play about 5 minutes of content for every 1 minute of ads.Minimum time between ads (Custom) Sets the minimum playback duration required between consecutive ads, in seconds
Example: If the threshold is 15, ads will not appear more frequently than once every 15 seconds.Minimum time before first ad Sets the minimum playback duration required before the first ad can be inserted, in seconds
Example: If the threshold is 45, the first ad will not appear until at least 45 seconds of content has played.Minimum content duration for midrolls Sets the minimum media item duration required before midroll ads can be inserted, in minutes
Example: If the threshold is 3 minutes, a 2-minute item will not include midroll ads.
⤴️ Return to step 6 of the main process.
Player bidding
Enable player bidding panel
Follow these steps to enable Player bidding:
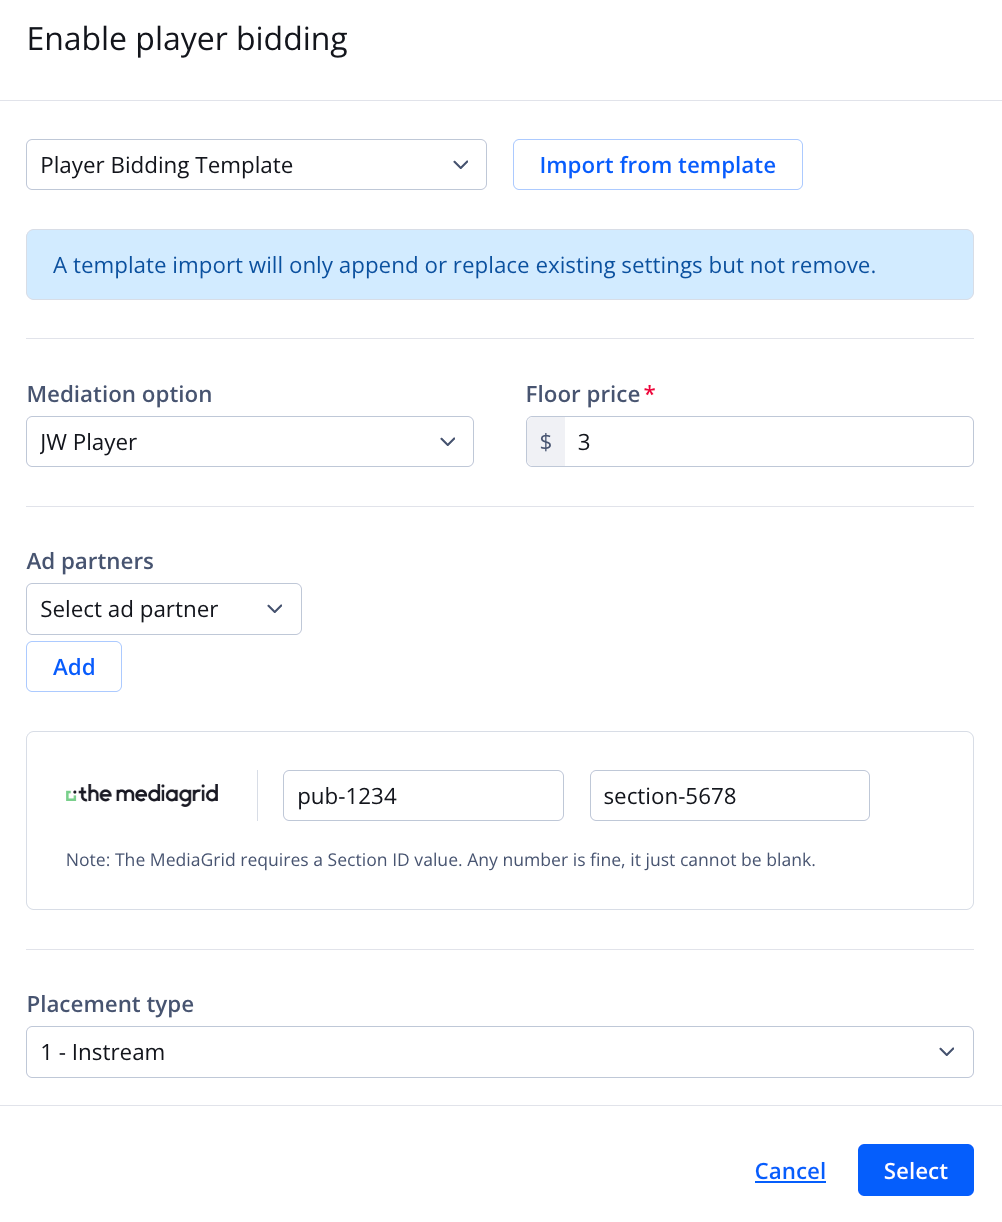
- Under Player bidding, click Enable. The Enable player bidding panel appears.
- Select a template from the dropdown menu.
If do not have a template, you can create a new one. Otherwise, skip to step 4.
- Click Import from template to populate all the fields.
If no additional changes are needed. skip to step 13. Otherwise, continue to step 4 to adjust the Player bidding settings.
- From the Mediation option dropdown menu, select a mediation option.
- (JW Player) In the Floor price text box enter a floor price.
Not all mediation options accept a floor price.
Determining the best floor price depends upon various factors. If you need assistance determining the best floor price, please consult with your JW Player representative or SSP partner.
- (JW Player) Choose your Ad partners:
- From the dropdown menu, select an ad partner.
- Click Add. The partner's name appears in a list on the lower part of the panel.
- (Optional) Repeat this steps i-ii to add another ad partner.
- Enter your ad partner information, such as publisher ID, section ID, or channel ID.
- From Placement type dropdown menu, select the IAB plcmt attribute.
- Enter the GPID.
The publisher-defined global placement ID (
imp.ext.gpid) represents a specific ad placement across different SSPs or platforms. - From the POS type dropdown menu, select the IAB 5.4 Ad Position value.
- Choose whether or not CCPA Applies. If you select Yes, you can click Advanced settings to set the Timeout(ms).
When enabling CCPA, you must have a recognized consent management platform (CMP). Otherwise, Prebid will reject the bid request and a bid error will occur.
- Choose whether or not GDPR Applies. If you select Yes, you can click Advanced settings to reveal additional options.
GDPR Advanced Settings
Enter your advanced settings for GDPR using either method below.
Option Description Manually configure - Under the Manually configure tab, enter a Timeout interval in milliseconds (ms).
- Click the Yes or No radio button to Treat as GDPR as Default.
- Select a CMP TCF Version.
- Click the Yes or No radio button to Disable Consent Management when No CMP.
See our Advertising configuration options for more information on disabling consent management when there is no CMP.Use existing content block - Under the Use existing content block tab, paste the GDPR object that you are using in your Prebid.js implementation.
When enabling GDPR, you must have a recognized consent management platform (CMP). Otherwise, Prebid will reject the bid request and a bid error will occur.
- Click Select. The panel closes.
Updated 4 months ago