
Triggers
A trigger allows you to define event rules that initiate actions.
Add a trigger
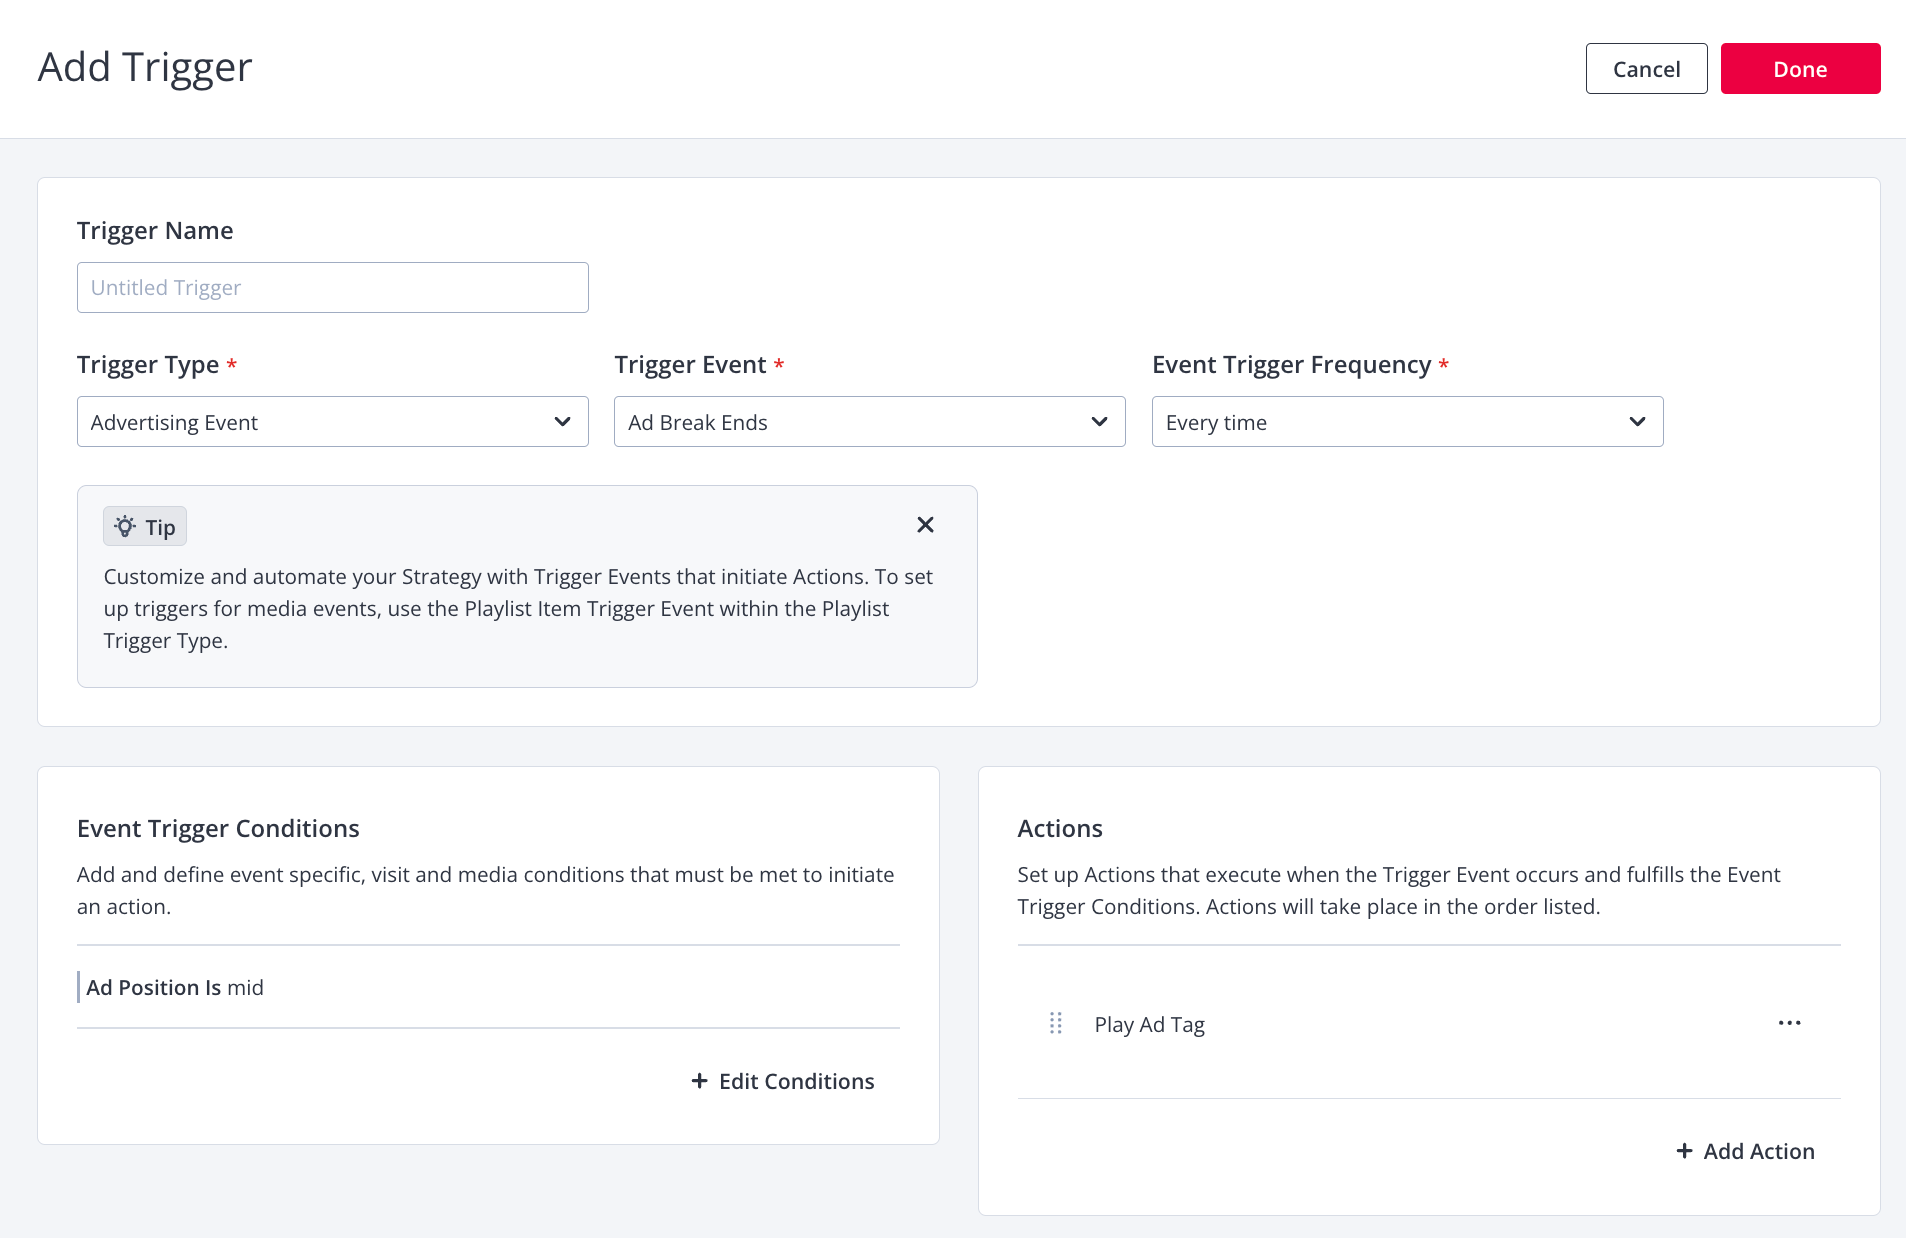
Add Trigger screen
Follow these steps to add a trigger:
- On the strategy tree, click +Add Experience > Trigger. The Add Trigger page appears.
- Enter a Trigger Name.
- Select a Trigger Type.
- Select a Trigger Event.
To learn more about a specific event and the properties returned when fired, refer to the following pages:
- Advertising Events
- Player/Playback Events
- Playlist Events
- Select the Event Trigger Frequency.
Optional Description Every time Executes each time the event fires First time Executes on the first occurrence the event fires
The first occurrence can occur when a new viewer session starts or the viewer's browser cache has been cleared.
Number of Occurrences Executes each time the event occurs until the specified number of occurrences is reached
JWX resets the occurrence count when a new viewer session begins or the viewer's browser cache is cleared.
- (Optional) Define the Event Trigger Conditions that must be met to initiate an action.
- Define the Actions to execute when the Trigger Event occurs.
- Click Done. The trigger is added to the strategy tree.
Event Trigger Conditions
-
Under Event Trigger Conditions, click + Add Condition. The Event Trigger Condition panel opens.
-
Define an event trigger condition to include in the rule:
Event Specific
Condition Description Ad Break ID Unique ID for each ad break
Use the following steps to set this event trigger condition:- From the dropdown menu, choose the comparative logic.
- In the last field, enter a value.
Ad Client Ad client in use for the ad break
Use the following steps to set this event trigger condition:- From the first dropdown menu, choose the comparative logic.
- From the next dropdown menu, select an option.
Ad Error Code Use the following steps to set this event trigger condition: - From the dropdown menu, choose the comparative logic.
- In the last field, enter a value.
Ad Error Message Ad error message
Use the following steps to set this event trigger condition:- From the first dropdown menu, choose the comparative logic.
- From the next dropdown menu, select an option.
Ad ID From the ad XML, ad server’s unique identifier for the creative
Use the following steps to set this event trigger condition:- From the dropdown menu, choose the comparative logic.
- In the last field, enter a value.
Ad Play ID Unique ID for each ad
Use the following steps to set this event trigger condition:- From the dropdown menu, choose the comparative logic.
- In the last field, enter a value.
Ad Position Position of the ad
Use the following steps to set this event trigger condition:- From the first dropdown menu, choose the comparative logic.
- From the next dropdown menu, select an option.
Ad Schedule Ad break information
Use the following steps to set this event trigger condition:- From the dropdown menu, choose the comparative logic.
- In the last field, enter a value.
Ad Tag URL of the ad tag that just completed
Use the following steps to set this event trigger condition:- From the dropdown menu, choose the comparative logic.
- In the last field, enter an ad tag URL.
Click Through URL Redirect URL
Use the following steps to set this event trigger condition:- From the dropdown menu, choose the comparative logic.
- In the last field, enter a click-through URL.
Current Time Position of the stream before the player seeks in seconds
Use the following steps to set this event trigger condition:- From the dropdown menu, choose the comparative logic.
- In the last field, enter a value.
Duration Total length of the ad creative (advertising) or current playlist item (player/playback) in seconds
Use the following steps to set this event trigger condition:- From the dropdown menu, choose the comparative logic.
- In the last field, enter a value.
Error Code Identifier for the error
See Player Errors Reference for a list of possible errors and error codes.
Use the following steps to set this event trigger condition:- From the dropdown menu, choose the comparative logic.
- In the last field, enter a value.
Error Message Error message that describes why the player could not be set up
Use the following steps to set this event trigger condition:- From the dropdown menu, choose the comparative logic.
- In the last field, enter a message.
Height New height of the player
Use the following steps to set this event trigger condition:- From the dropdown menu, choose the comparative logic.
- In the last field, enter a value.
Index Index of the currently playing playlist item
Use the following steps to set this event trigger condition:- From the dropdown menu, choose the comparative logic.
- In the last field, enter a value.
Linear Whether the ad is linear (plays in sequence with the video content) or non-linear (appears as an overlay on the video)
Use the following steps to set this event trigger condition:- From the first dropdown menu, choose the comparative logic.
- From the next dropdown menu, select an option.
Media Custom Parameters User-generated name-value pairs
As examples, custom fields can be used when setting cue points or storing legacy media IDs.
Use the following steps to set this event trigger condition:- In the first field, enter the custom key.
- From the dropdown menu, choose the comparative logic.
- In the last field, enter a value.
Media ID Unique ID of a media item
Use the following steps to set this event trigger condition:- From the dropdown menu, choose the comparative logic.
- In the last field, enter a value.
Offset Number Position that has been requested for seeking (in seconds)
Use the following steps to set this event trigger condition:- From the dropdown menu, choose the comparative logic.
- In the last field, enter a value.
Old State Previous state of the player
Use the following steps to set this event trigger condition:- From the first dropdown menu, choose the comparative logic.
- From the next dropdown menu, select an option.
Pause Reason Reason ad playback has been paused
Use the following steps to set this event trigger condition:- From the first dropdown menu, choose the comparative logic.
- From the next dropdown menu, select an option.
Placement Value sent in a bid request that identifies the location of a player
Use the following steps to set this event trigger condition:- From the first dropdown menu, choose the comparative logic.
- From the next dropdown menu, select an option.
Placement Value sent in a bid request that identifies the location of a player
Use the following steps to set this event trigger condition:- From the first dropdown menu, choose the comparative logic.
- From the next dropdown menu, select an option.
Play Reason Reason for the play
Use the following steps to set this event trigger condition:- From the first dropdown menu, choose the comparative logic.
- From the next dropdown menu, select an option.
Player Old State State of the player prior to ad pause
Use the following steps to set this event trigger condition:- From the first dropdown menu, choose the comparative logic.
- From the next dropdown menu, select an option.
Position Playback position in seconds
Use the following steps to set this event trigger condition:- From the dropdown menu, choose the comparative logic.
- In the last field, enter a value.
Position Number Position of the player before it seeks, in seconds
Use the following steps to set this event trigger condition:- From the dropdown menu, choose the comparative logic.
- In the last field, enter a value.
Response Code Use the following steps to set this event trigger condition: - From the dropdown menu, choose the comparative logic.
- In the last field, enter a value.
Setup Time Amount of time in milliseconds for the player to go from
setup()to ready
Use the following steps to set this event trigger condition:- From the dropdown menu, choose the comparative logic.
- In the last field, enter a value.
Tags Single tag associated with the media item
Use the following steps to set this event trigger condition:- From the dropdown menu, choose the comparative logic.
- In the last field, enter a single tag.
This Waterfall Item Use the following steps to set this event trigger condition: - From the dropdown menu, choose the comparative logic.
- In the last field, enter a value.
Title Title of the media item
Use the following steps to set this event trigger condition:- From the dropdown menu, choose the comparative logic.
- In the last field, enter a value.
Total Waterfall Items Use the following steps to set this event trigger condition: - From the dropdown menu, choose the comparative logic.
- In the last field, enter a value.
Viewable If the player is viewable or not
The player is viewable when it is at least 50% in view and in the active tab. The player is not viewable when it is below 50% in view or in an inactive tab.
Use the following steps to set this event trigger condition:- From the dropdown menu, choose the comparative logic.
- Click the True or False radio button to define the viewability value.
Width New width of the player
Use the following steps to set this event trigger condition:- From the dropdown menu, choose the comparative logic.
- In the last field, enter a value.
Geography
JWX gathers geographical data by analyzing a viewer's internet connection through its Global Content Delivery Network (CDN). This method is not always accurate.
The precision of location data can vary depending on the internet connection’s characteristics. Inaccurate location may occur during the following cases:
- VPNs. If a viewer employs a VPN, JWX’s CDN will identify the location of the VPN server rather than the viewer’s actual geography.
- Mobile devices. As determined by a service provider’s traffic management, mobile internet users may appear in a general area rather than a precise location.
Type Description Country Follow the steps to set the visit condition: - From the first dropdown menu, select Country.
- From the next dropdown menu, select the inclusive or exclusive logic operator.
- From the final dropdown menu, select a country.
Region Larger economic or geographic area containing multiple countries, such as EMEA, EU, and LATAM
Follow the steps to set the visit condition:- From the first dropdown menu, select Region.
- From the next dropdown menu, select the inclusive or exclusive logic operator.
- From the final dropdown menu, select a region.
Subdivision Canadian province or US state
Follow the steps to set the visit condition:- From the first dropdown menu, select Subdivision.
- From the next dropdown menu, select the inclusive or exclusive logic operator.
- From the final dropdown menu, select a province or state.
Media
Condition Description Duration Total length of the item in seconds
Use the following steps to set this event trigger condition:- From the dropdown menu, choose the comparative logic.
- In the last field, enter a value.
ID Unique ID of a media item
Use the following steps to set this event trigger condition:- From the dropdown menu, choose the comparative logic.
- In the last field, enter a value.
Media Custom Parameters User-generated name-value pairs
As examples, custom fields can be used when setting cue points or storing legacy media IDs.
Use the following steps to set this event trigger condition:- In the first field, enter the custom key.
- From the dropdown menu, choose the comparative logic.
- In the last field, enter a value.
Tags Single tag associated with the media item
Use the following steps to set this event trigger condition:- From the dropdown menu, choose the comparative logic.
- In the last field, enter a single tag.
Title Title of the media item
Use the following steps to set this event trigger condition:- From the dropdown menu, choose the comparative logic.
- In the last field, enter a value.
Custom
Type Description Key Value Pair Custom data added for a specific placement
Follow the steps to set the visit condition:- From the first dropdown menu, select Key Value Pair.
- In the next text field, enter a key.
- From the next dropdown menu, select the logic operator.
- In the final text field, enter a value.
Device
Type Description Operating System Follow the steps to set the visit condition: - From the first dropdown menu, select Operating System.
- From the next dropdown menu, select the inclusive or exclusive logic operator.
- From the final dropdown menu, select the operating system.
Device Type Category of devices based on primary form factor and use case, such as desktop and phone
Follow the steps to set the visit condition:- From the first dropdown menu, select Device type.
- From the next dropdown menu, select the inclusive or exclusive logic operator.
- From the final dropdown menu, select the device type.
Local Date/Time
Type Description Day of Month Follow the steps to set the visit condition: - From the first dropdown menu, select Day of Month.
- From the next dropdown menu, select the logic operator.
- From the final dropdown menu, select a value.
Day of Week Follow the steps to set the visit condition: - From the first dropdown menu, select Day of Week.
- From the next dropdown menu, select the logic operator.
- From the final dropdown menu, select a day.
Hour Follow the steps to set the visit condition: - From the first dropdown menu, select Hour.
- From the next dropdown menu, select the logic operator.
- From the final dropdown menu, select an hour. Values are based on a 24-hour clock.
Local Date Follow the steps to set the visit condition: - From the first dropdown menu, select Local Date.
- From the next dropdown menu, select the logic operator.
- From the date picker, select a date.
Minute Follow the steps to set the visit condition: - From the first dropdown menu, select Minute.
- From the next dropdown menu, select the logic operator.
- From the final dropdown menu, select a minute value.
Month of Year Follow the steps to set the visit condition: - From the first dropdown menu, select Month of Year.
- From the next dropdown menu, select the logic operator.
- From the final dropdown menu, select a month.
Year Follow the steps to set the visit condition: - From the first dropdown menu, select Year.
- From the next dropdown menu, select the logic operator.
- From the text field, enter four-digit year.
UTC Date/Time
Type Description Day of Month Follow the steps to set the visit condition: - From the first dropdown menu, select Day of Month.
- From the next dropdown menu, select the logic operator.
- From the final dropdown menu, select a value.
Day of Week Follow the steps to set the visit condition: - From the first dropdown menu, select Day of Week.
- From the next dropdown menu, select the logic operator.
- From the final dropdown menu, select a day.
Hour Follow the steps to set the visit condition: - From the first dropdown menu, select Hour.
- From the next dropdown menu, select the logic operator.
- From the final dropdown menu, select an hour. Values are based on a 24-hour clock.
Local Date Follow the steps to set the visit condition: - From the first dropdown menu, select Local Date.
- From the next dropdown menu, select the logic operator.
- From the date picker, select a date.
Minute Follow the steps to set the visit condition: - From the first dropdown menu, select Minute.
- From the next dropdown menu, select the logic operator.
- From the final dropdown menu, select a minute value.
Month of Year Follow the steps to set the visit condition: - From the first dropdown menu, select Month of Year.
- From the next dropdown menu, select the logic operator.
- From the final dropdown menu, select a month.
UTC Date Follow the steps to set the visit condition: - From the first dropdown menu, select UTC Date.
- From the next dropdown menu, select the logic operator.
- From the date picker, select a date.
Year Follow the steps to set the visit condition: - From the first dropdown menu, select Year.
- From the next dropdown menu, select the logic operator.
- From the text field, enter four-digit year.
The available conditions will vary based on the chosen trigger event.
An event trigger condition can be comprised of multiple rules:
- To group a set of similar rules together, click + Add Rule and definite another event trigger condition. All rules are joined together using
ANDlogic exclusively, requiring all conditions to be satisfied together. - To create multiple groups of related rules, click + Add Group and define another event trigger condition. Multiple groups are joined together using
ORlogic exclusively, requiring the conditions of only one group to be satisfied.
-
Click Apply. The panel closes. The trigger condition appears in the Event Trigger Conditions section.
Actions
- Under Actions, click + Add Action. The Add action panel opens.
- Select an Action type.
- Select an Action. Depending on the selected action, one or several additional options may appear.
- If applicable, use the following table to define additional action settings:
Additional Action Settings
Setting Description Ad Tag URL URL of the ad tag to play
Follow this step to define this action:- In the field, enter the ad tag URL.
Code Editor XML ad code to execute
Follow this step to set this event trigger condition:- In the field, enter the code to execute.
Configure Ad Breaks Determines whether to remove ad breaks, customize ad breaks, or use a VMAP URL Remove ad breaks
Follow this step to define this action:- Click the Remove ad breaks radio button.
Change ad breaks manually
Follow these steps to define this action:- Click the Change ad breaks manually radio button. The ad break settings appear.
- For the Preroll, Midroll, or Postroll, click + Add. The Ad Tag URL field appears.
- Enter the Ad Tag URL.
- (Optional) Click Use Key for Ad Tag if available. From the dropdown, select the key for the custom data.
NOTE: If the key you need does not exist, add the key. - (Midroll) Select an option from the Break Timing dropdown menu.
- (Midroll) Next to the Break Timing dropdown menu selection, enter the location in the video where a midroll ad break occurs:
- For Seconds into Video, enter the location in seconds
- For % of Video, enter the location as a percentage -- without % (for example, 15 for 15%) -- of the video.
- For Timecode, enter the location in the following format: hh:mm:ss:mmm.
VMAP
Follow this step to define this action:- Click the VMAP radio button. The Ad Tag URL field appears.
- Enter the Ad Tag URL.
- (Optional) Click Use Key for Ad Tag if available. From the dropdown, select the key for the custom data.
NOTE: If the key you need does not exist, add the key.
Float Player Enables or disables floating player functionality
When enabled, the player is kept visible when the original player location is scrolled out of view by minimizing it to a corner of the screen.
Follow this step to define this action:- Click the toggle to ON to enable floating the player.
JavaScript Code Editor Custom code to execute
Follow this step to set this event trigger condition:- In the field, enter the JavaScript code to execute.
Jump to Location in the video to navigate to in hh:mm:ss.mmm format
Follow these steps to define this action:- Click on the hour portion of the time.
- Enter a number for the hour or click the tab key on your keyboard.
- Repeat step to enter the minutes, seconds, and milliseconds of the location.
Mute Player Silences content during playback
Follow this step to define this action:- Click the toggle to ON to mute the content.
Partner Settings for a partner experience
A partner experience occurs only after a JWX experience and automatically switches from the JWX experience to the partner experience. It inherits the media curation configuration and ad tag defined in the JWX experience.
By default, the partner experience also includes the Remove Player trigger action.
Follow these steps to define additional action settings:- Select a Partner. The partner-specific fields appear.
- Enter the partner-specific information.
Connatix
- Enter your Customer ID.
- Enter the Player ID.
- Enter the Preroll Line Item ID.
Pause Enables or disables pause ad functionality
Follow this step to define this action:- Click the toggle to ON to pause the ad.
Set Autostart Configures the autostart behavior of the player
Follow this step to define this action:- Click the radio button next to an autostart option.
Type Type of content to load
Follow these steps to define this action:- Click the radio button next to Single Media or Playlist.
- From the dropdown menu, select the media or playlist.
Volume Sets the volume of the content during playback
Follow this step to define this action:- In the field enter a value between 0-100.
- Click Apply. The panel closes. The action is applied to the trigger.
- (Optional) Repeat the previous steps to add another action. When multiple actions are applied to a trigger, they are applied sequentially.
Updated about 2 months ago