Build a line item
Learn how to create a line items
A line item is the core unit that bundles all the elements needed to deliver an ad.
It connects a creative with the following elements so ads render under predefined conditions:
- Targeting rules
- Pricing
- Caps
- Delivery settings
Each line item gives you the flexibility and control to maximize revenue while ensuring a campaign serves as intended.
Prerequisites
| Setting | Description |
|---|---|
| Creative | Ad asset delivered to viewers through the video player
Learn how to create a new creative. |
| Targeting rules | (Optional) Rules defining when and where ads render, ensuring campaigns reach the intended audience in the right context
Learn how to create a targeting rule. If no targeting rule has been defined, the line item will serve to all web traffic. |
Create a line item
Follow these steps to create a targeting rule:
- On the Line items page, click Create line item.
- Define the general details of the line item.
- (Optional - Smart ad server) Set ad quality specifications.
- Define the line item serving details.
- Click Save. The line item is saved.
General
General tab
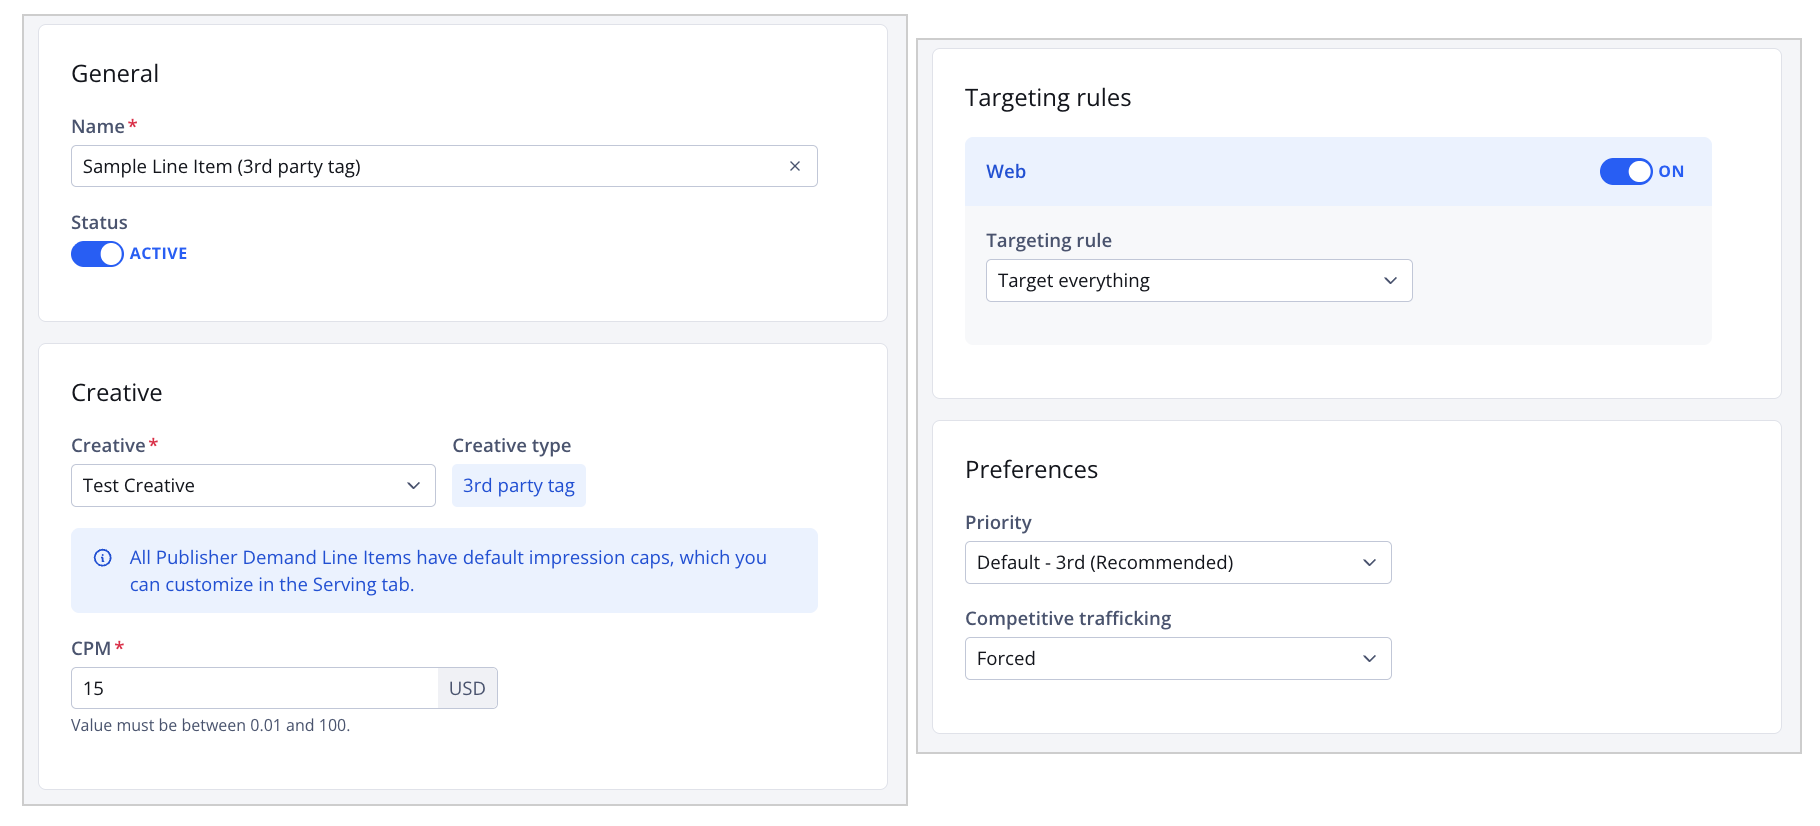
The General tab allows you to set up the core details of a line item:
- Name and status
- Creative
- Floor price
- Targeting rules
- Priority
- Competitive trafficking
Follow these steps to define the core line item details:
- On the General tab, enter a line item Name.
- Click the Status toggle to ACTIVE.
By default, a new line item is INACTIVE. Set the status to ACTIVE to make the line item eligible to deliver impressions.
If you’re not ready to complete setup (for example, adding targeting or flight dates), leave this setting as INACTIVE and change it to ACTIVE later.
- Select a Creative.
- Set the floor price.
Option Description CPM (3rd party tag, JS API defined) Sets a price for ad impressions Floor CPM (Prebid.js) Sets a floor price for ad impressions
Follow these steps to set the price:- Select the Floor CPM. A field appears.
- Enter a value between 0.01 - 100 to set the cost per mille (cost per thousand impressions) in USD.
Min CPM (Smart server bidding) Sets a minimum price for ad impressions
Follow these steps to set the price:- Select the Min CPM. A field appears.
- Enter a value between 0.01 - 100 to set the cost per mille (cost per thousand impressions) in USD.
Fixed CPM (Smart server bidding) Sets a static floor price for ad impressions
Follow these steps to set the price:- Select Fixed CPM. A field appears.
- Enter a value between 0.01 - 100 to set the cost per mille (cost per thousand impressions) in USD.
Floor price predictor (Prebid.js, Smart server bidding) Automates floor price decisions in real time
Follow these steps to set the price:- Select Floor price predictor.
- (Optional) In the price field, set the minimum CPM.
- (Optional) Under Targeting rules, enable a targeting rule for at least one platform:
- Click the toggle to ON. The specific platform section expands.
- Select a Targeting rule from the dropdown menu.
If no targeting rule is selected, all platforms will be targeted.
- Under Preferences, select the Priority.
Priority Description Top - 1st Overrides all other bids, even if those bids are higher priced
Common usage: Campaigns that must deliver regardless of competing demandPreferred - 2nd Takes precedence over Default and House
Common usage: Campaigns that should be favored over most demand but don’t require guaranteed deliveryDefault - 3rd
(Recommended)Competes evenly with demand from other sources on a level playing field
Common usage: Recommended for most line itemsHouse - 4th Serves as a backup when no other demand is available
Common usage: Unsold inventory, often used for self-promotion
- Select a Competitive trafficking option.
Competitive trafficking Description Optimized Line item entered into the auction, based on its performance
Common usage: Campaigns that must deliver regardless of competing demandForced Line item entered into the auction regardless of its performance
Publisher demand line items are set to Forced by default to ensure they are entered into the auction every time.
Ad quality
The Ad quality tab allows you to manage which ads are permitted to serve. You can exclude IAB categories from serving ads, with the option to refine subcategories within each selection.
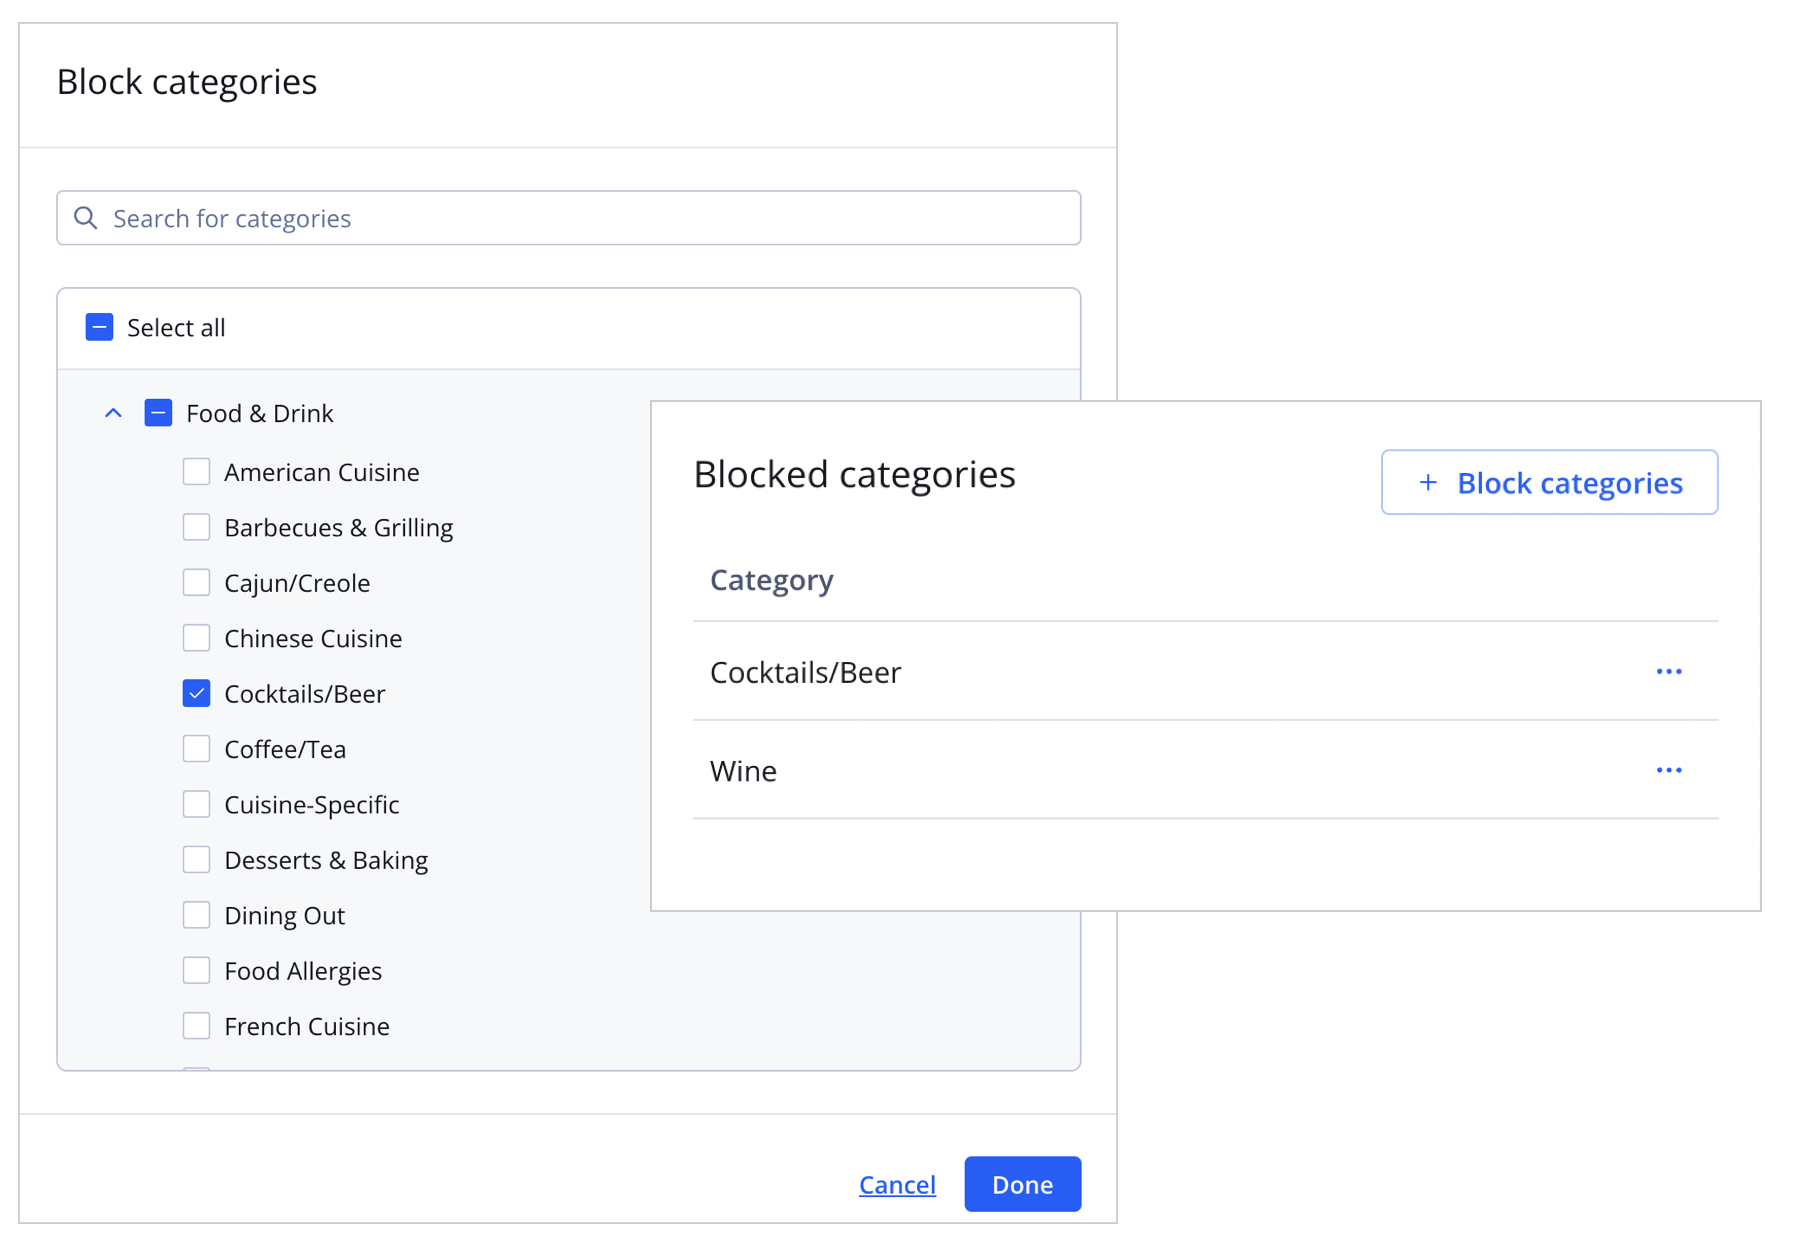
Block categories panel and Blocked categories section
Follow these steps to block specific categories:
- Click + Block categories. The Block categories panel opens.
- (Optional) Search for a category.
- Select one or more top-level categories.
- (Optional) Refine selected top-level categories:
- Expand a top-level category.
- Click the checkbox next to one or more subcategories to include in the blocked categories list.
- Click Done. The panel closes and the selected categories and subcategories appear under Blocked categories.
Serving
The Serving tab allows you to define when and how a line item delivers. You can control spend, impressions, requests, and delivery timing by configuring the following line item settings:
Flight dates

Flight dates section
| Setting | Description |
|---|---|
| Flight dates | Period during which a line item runs
All dates are based on Coordinated Universal Time (UTC) time. Follow these steps to set the flight dates:
|
Budget caps
The Budget caps section allows you to limit a line item’s spend, impressions, or requests at both total and daily levels. You can also control delivery patterns with budget pacing options, which distribute spend or impressions over time.
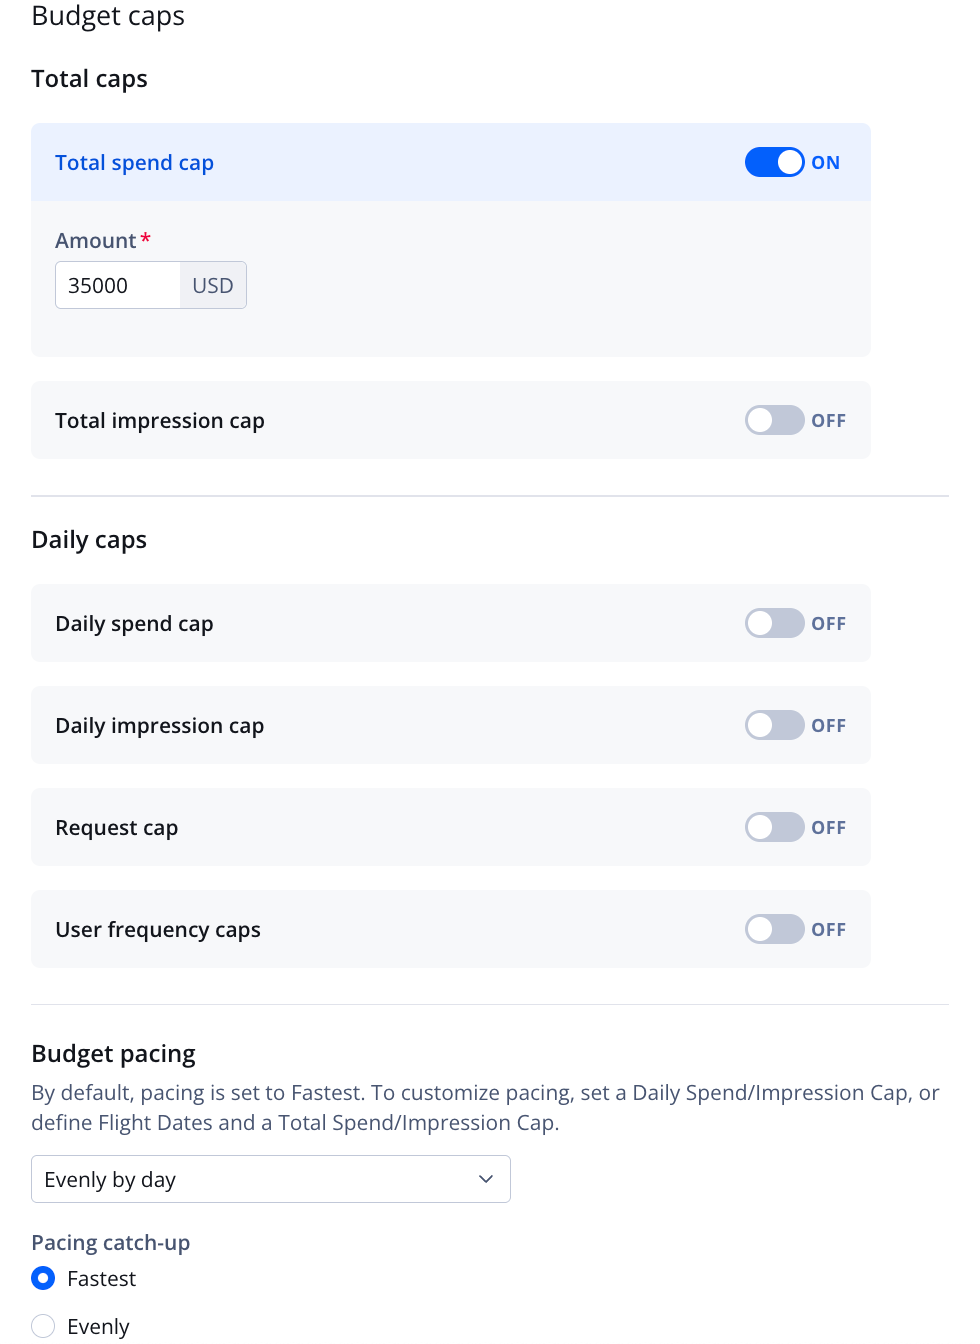
Budget caps section
| Setting | Description |
|---|---|
| Total spend cap | Maximum budget a line item can spend
When the cap is reached, the line item stops running and changes to Capped status. Follow these steps to set the total spend cap:
|
| Total impression cap | Maximum number of impressions a line item can serve over its lifetime
When the cap is reached, the line item stops running and changes to Completed status. Historical impressions are always included in the total count. Follow these steps to set the total impression cap:
|
| Daily spend cap | Maximum budget a line item can spend in a single day, in USD
Follow these steps to set the daily spend cap:
|
| Daily impression cap | Maximum number of impressions a line item can serve in a single day
Follow these steps to set the daily impression cap:
|
| Request cap | Maximum number of ad requests a line item can send in a single day
Follow these steps to set the request cap:
|
| User frequency cap | Maximum number of times a single user can be shown an ad from the line item in a single day (UTC time)
Follow these steps to set the user frequency cap:
|
| Budget pacing | Distribution pattern for how a line item’s budget or impressions are spent over time
Fastest(Default) Spends the budget as quickly as possible, starting on the first day of the flight Evenly by hourDistributes the budget evenly across each hour of the flight, redistributing delivery over the remaining hours when overdelivery or underdelivery occurs Follow these steps:
Evenly by dayDistributes the budget evenly across each day of the flight when a Total cap is set, redistributing delivery over the remaining days if overdelivery or underdelivery occurs Follow these steps:
|
Player caps

Player caps settings
The Player caps section allows you to limit the number of ad requests or impressions at the player, content, or ad opportunity level.
| Setting | Description |
|---|---|
| Player load | Maximum number of ad requests or impressions allowed within a set timeframe
Follow these steps to define the player load:
|
| Content load | Maximum number of ad requests or impressions allowed while the same content is playing
Follow these steps to define the content load:
|
| Ad opportunity | Maximum number of ad requests allowed for a single ad opportunity
Follow these steps to define ad opportunities:
|
Ad break serving
The Ad break serving section allows you to define when ads play within ad breaks. You can target all breaks or specific breaks.
Ad schedules cannot be used with the ad server.

Targeting everything setting
Click Target everything to target all ad breaks.
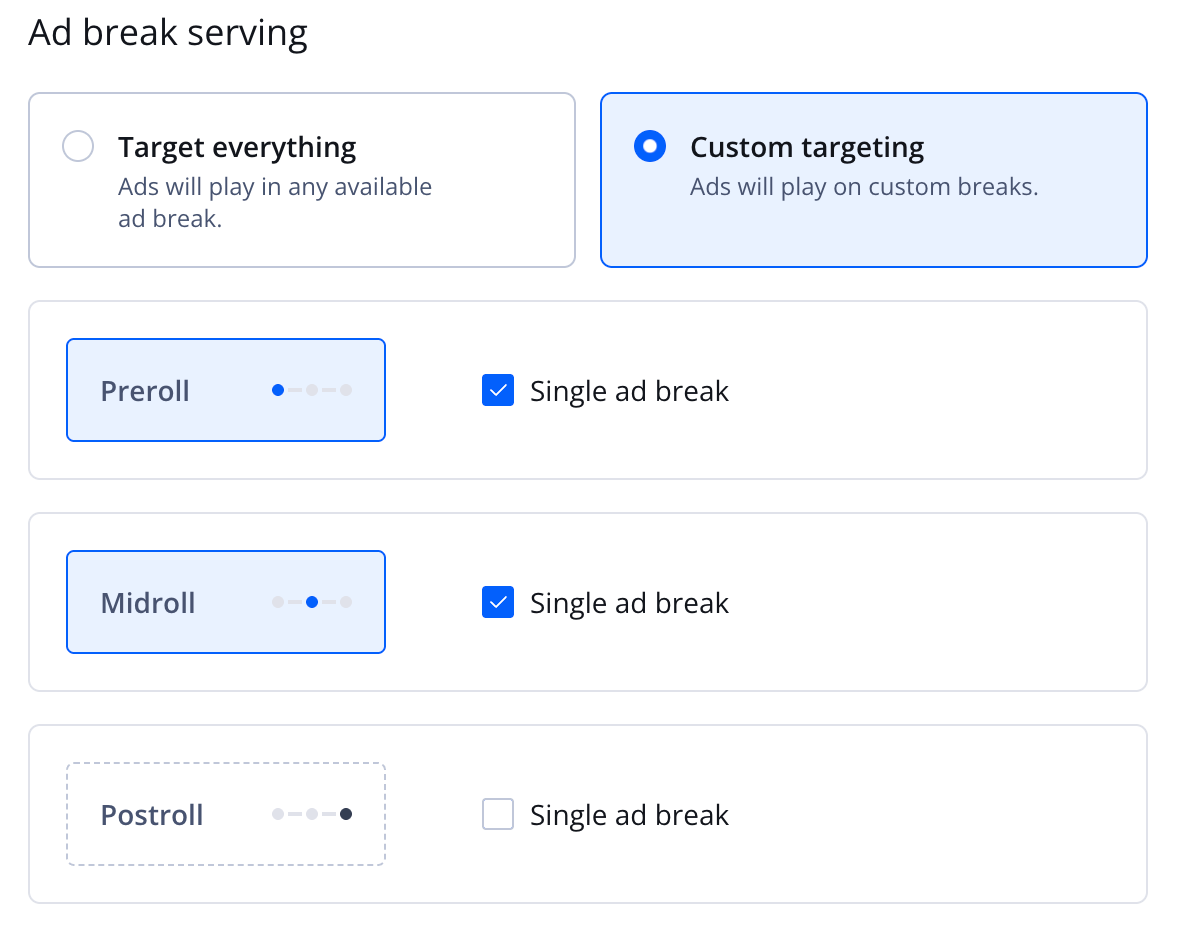
Custom targeting settings
Follow these steps to define custom targeting:
- Click Custom targeting. The targeting settings appear.
- Click Single ad break next to each type of ad break to target.
Updated 7 months ago