
Create an ad optimization experience
Tailor and deliver server-side ad experiences for different audience segments
Ad optimization allows you to tailor server-side ad experiences for different audiences. Create audience segments from request and media data, then define the advertising behavior that JWX applies when each segment matches.
Prerequisites
| Item | Description |
|---|---|
| Account entitlements | Entitlements to unlock feature access Contact your JWX representative to enable ad optimization for your property. |
| Ad config | Configuration defining when to show ads within content and where ads are sourced Choose an ad config with ad placements, an ad tag, and break settings that represent the experience you want to deliver or evaluate for your segment. Learn how to create an ad config. |
| Bumpers | (Optional) Property-level bumper enablement Bumpers are not required to create an ad optimization experience. However, JWX must enable bumpers for your property before you can configure bumper behavior for audience segments. Contact your JWX representative to enable bumpers and configure your bumper files. |
Create an ad optimization experience
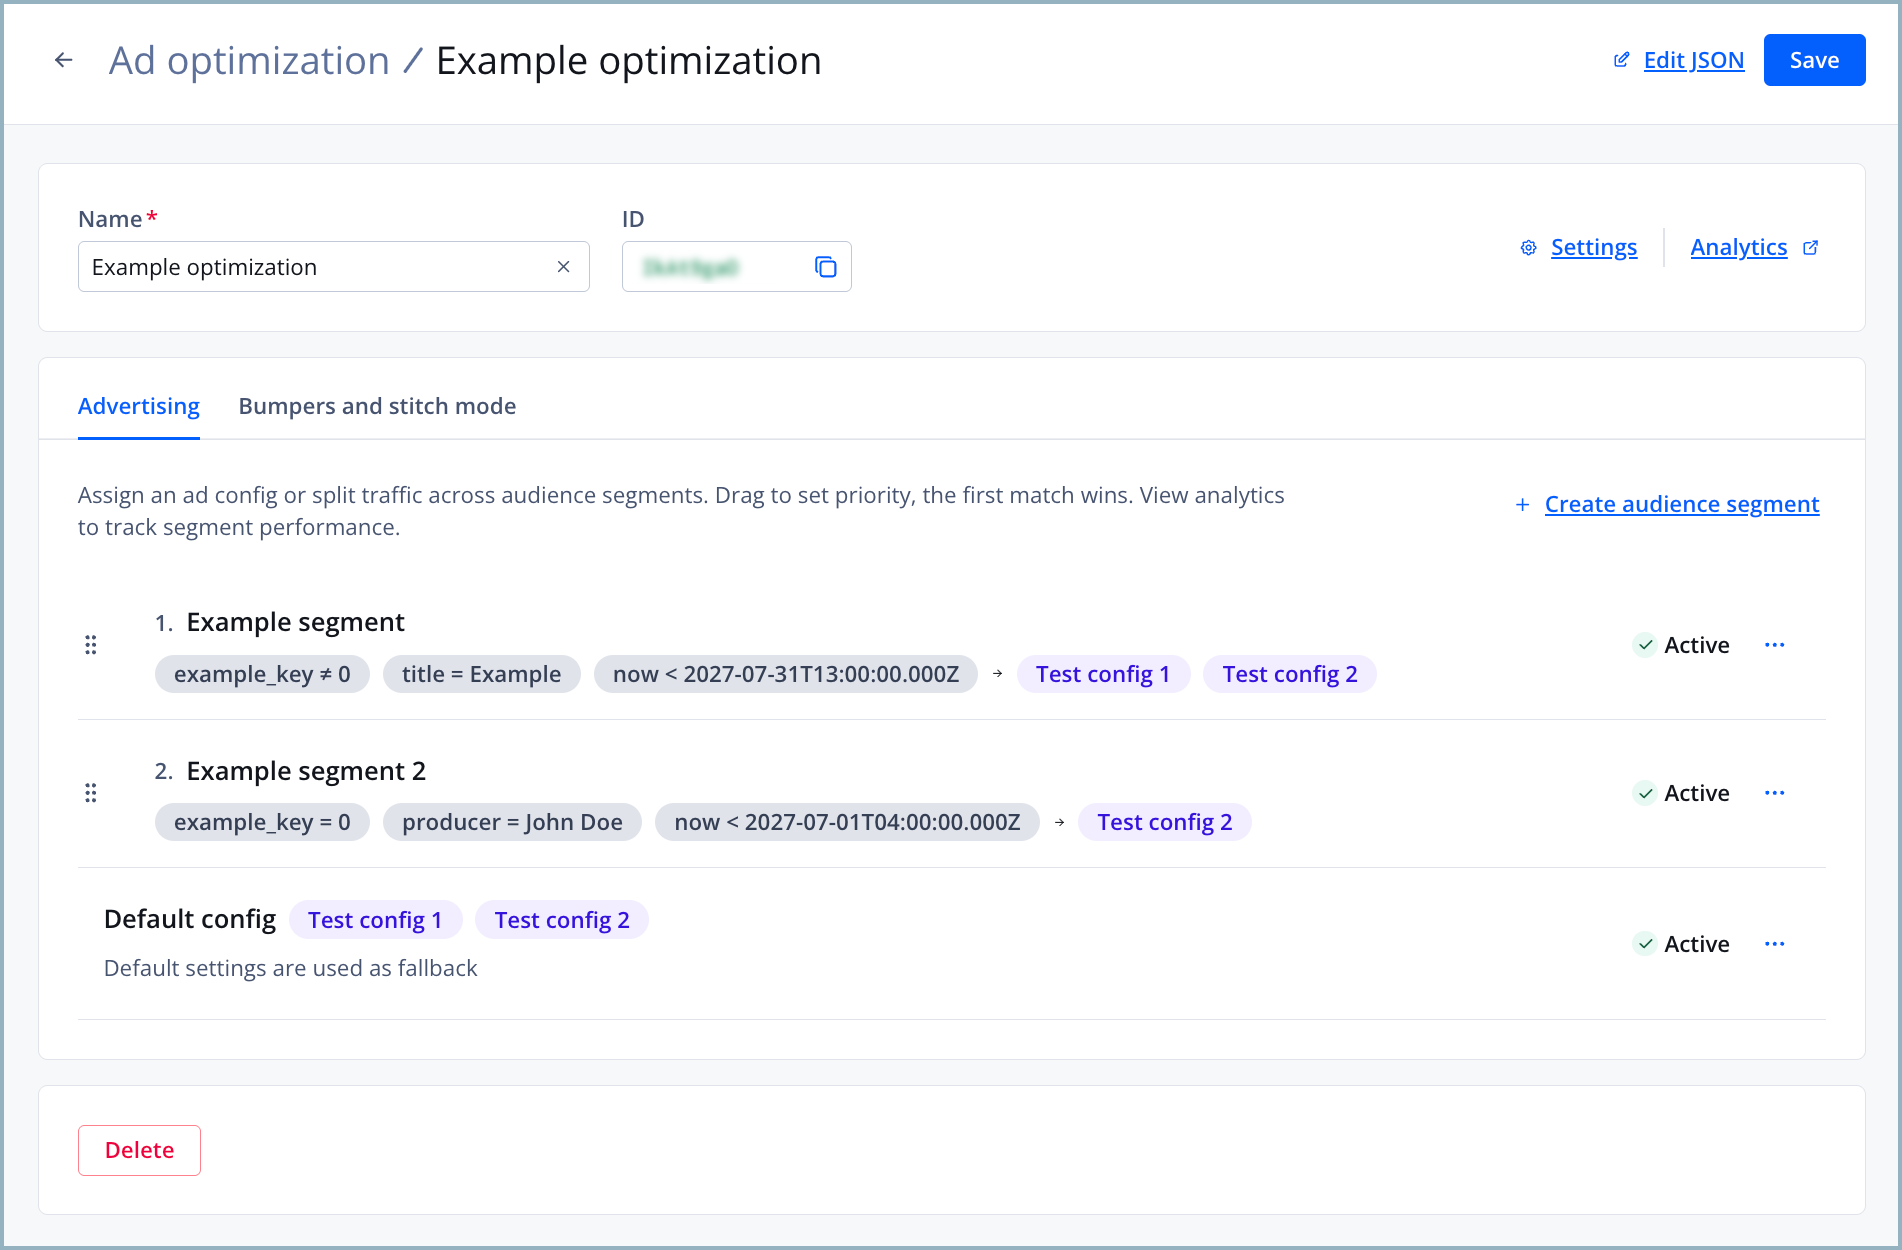
Ad optimization details page
Follow these steps to create an ad optimization experience:
-
On the Ad insertion page, under the Ad optimization tab, click Create ad optimization. The ad optimization details page appears.
-
Enter a Name for the experience.
-
You can also use the JSON editor to define the ad optimization experience (steps 3–5).
-
Click Save. The ad optimization experience appears on the Ad optimization tab, along with its ID.
-
In the row of the ad optimization, in the ID column, click
 (copy icon) to copy the ID to your clipboard.
 -
In your SSAI manifest request, add the ID as the value for
ad_config_id. This activates the ad optimization experience.https://cdn.jwplayer.com/v2/sites/{site_id}/media/{media_id}/ssai.{manifest_extension}?ad_config_id={ad_optimization_id}
The ad optimization experience is now applied to the viewer session. JWX evaluates the request against the configured audience segments and returns the resulting SSAI manifest.
Set up advertising
Follow these steps to set up advertising:
-
On the Advertising tab, click + Add default. The Add default audience segment panel appears.
-
Enter a Name for the default segment.
-
From the dropdown menu, select an Ad config to apply when no advertising audience segment matches.
-
(Optional) Click Split traffic to distribute the default traffic across multiple ad configs:
-
Select ad config A and enter its traffic percentage.
-
Select ad config B and enter its traffic percentage.
-
(Optional) Click + Add ad config to add additional ad configs.
Click Split evenly to adjust all traffic to an equal percentage across the ad configs.
-
-
Click Save. The default segment appears under Advertising.
-
Click + Create audience segment. The Create audience segment panel appears.
-
Enter a Name for the segment.
-
Under If all of the following is true, define the condition:
-
From Select parameter, choose the source of the value. Values include Query, Media, Date & time, Location, Device type, Platform, Browser, and Referrer.
-
Set the parameter value.
Parameter Steps Query Follow these steps: - Enter the key to evaluate.
- Select a comparison operator.
- Enter or select the comparison value.
Media Follow these steps: - Enter the key to evaluate.
- Select a comparison operator.
- Enter or select the comparison value.
Date & time Follow these steps: - Select a comparison operator.
- Select a date from the calendar dropdown menu.
- Select a time from the clock dropdown menu.
Location Follow these steps: - Select a comparison operator.
- Select a country to target from the dropdown menu.
Device type Follow these steps: - Select a comparison operator.
- Select a device type to target from the dropdown menu.
Platform Follow these steps: - Select a comparison operator.
- Select a platform to target from the dropdown menu.
Browser Follow these steps: - Select a comparison operator.
- Select a browser to target from the dropdown menu.
Referrer Follow these steps: - Select a comparison operator.
- Enter the request source URL to target in the text box.
-
(Optional) Click + Add condition and repeat steps 8a–b.
-
-
Under Then, select the Ad config to apply to matching requests.
-
(Optional) Click Split traffic to distribute matching traffic across multiple ad configs. Follow the guidance in steps 4a–c.
-
Click Save. The segment appears under Advertising.
-
(Optional) Repeat steps 6–11 to create additional audience segments.
-
If multiple segments exist, drag the segments into the order JWX should evaluate them. JWX prioritizes segments from top to bottom.
Configure bumpers and stitch mode
Define the bumper or stitching behavior without changing the ad config assigned to the same request.
Bumpers
Follow these steps to configure bumpers:
- On the Bumpers and stitch mode tab, in the Bumpers section, click + Create audience segment. The Create audience segment panel appears.
- Enter a Name for the segment.
- Under If all of the following is true, define the condition:
-
From Select parameter, choose the source of the value.
-
Set the parameter value.
Parameter Steps Query Follow these steps: - Enter the key to evaluate.
- Select a comparison operator.
- Enter or select the comparison value.
Media Follow these steps: - Enter the key to evaluate.
- Select a comparison operator.
- Enter or select the comparison value.
Date & time Follow these steps: - Select a comparison operator.
- Select a date from the calendar dropdown menu.
- Select a time from the clock dropdown menu.
Location Follow these steps: - Select a comparison operator.
- Select a country to target from the dropdown menu.
Device type Follow these steps: - Select a comparison operator.
- Select a device type to target from the dropdown menu.
Platform Follow these steps: - Select a comparison operator.
- Select a platform to target from the dropdown menu.
Browser Follow these steps: - Select a comparison operator.
- Select a browser to target from the dropdown menu.
Referrer Follow these steps: - Select a comparison operator.
- Enter the request source URL to target in the text box.
-
(Optional) Click + Add condition and repeat steps 3a–b. All conditions must be true for the segment to match.
-
- Under Then, set Bumpers to ON to enable bumpers for matching requests. Keep the default OFF setting to disable them.
- Click Save. The segment appears under Bumpers.
- (Optional) Repeat steps 1–5 to create additional audience segments for bumpers.
- If multiple segments exist, drag the segments into the order JWX should evaluate them. JWX prioritizes segments from top to bottom.
Stitch mode
Follow these steps to configure stitch mode:
-
On the Bumpers and stitch mode tab, in the Stitch mode section, click + Create audience segment. The Create audience segment panel appears.
-
Enter a Name for the segment.
-
Under If all of the following is true, define the condition:
-
From Select parameter, choose the source of the value.
-
Set the parameter value.
Parameter Steps Query Follow these steps: - Enter the key to evaluate.
- Select a comparison operator.
- Enter or select the comparison value.
Media Follow these steps: - Enter the key to evaluate.
- Select a comparison operator.
- Enter or select the comparison value.
Date & time Follow these steps: - Select a comparison operator.
- Select a date from the calendar dropdown menu.
- Select a time from the clock dropdown menu.
Location Follow these steps: - Select a comparison operator.
- Select a country to target from the dropdown menu.
Device type Follow these steps: - Select a comparison operator.
- Select a device type to target from the dropdown menu.
Platform Follow these steps: - Select a comparison operator.
- Select a platform to target from the dropdown menu.
Browser Follow these steps: - Select a comparison operator.
- Select a browser to target from the dropdown menu.
Referrer Follow these steps: - Select a comparison operator.
- Enter the request source URL to target in the text box.
-
(Optional) Click + Add condition and repeat steps 3a–b. All conditions must be true for the segment to match.
-
-
Under Then, select the Stitch mode to apply to matching requests:
- SSAI: (Non-just-in-time) Ads are stitched for the entire duration of the video-on-demand media.
- JIT: (Just-in-time) Ads are stitched immediately before the ad break.
-
Click Save. The segment appears under Stitch mode.
-
(Optional) Repeat steps 1–5 to create additional audience segments for stitch mode.
-
If multiple segments exist, drag the segments into the order JWX should evaluate them. JWX prioritizes segments from top to bottom.
Configure advanced settings
The advanced settings allow you to create A/B test assignments for the ad optimization experience.
Follow these steps to configure the settings:
-
In the top section of the page, click Settings. The Advanced settings page appears.
-
Under A/B test assignment, select an option to determine how viewers are assigned to an ad config when traffic splits.
Option Description Default Viewers are assigned by user-agent and IP address. Viewers may switch ad configs if their IP changes.
Follow this step:- Click Default.
Custom key Viewers are assigned by manifest identifier, such as a device or user ID. Each value consistently maps to the same ad config for reliable experiment results.
Follow these steps:- Click Custom key.
- From the dropdown menu, select a key type (
query/,media/, orheader/). - In the textbox, enter a key.
- (Optional) Click + Add another key and repeat steps 1–3 to add another key.
-
Click Save. The Advanced settings panel closes.
Define the JSON configuration
In addition to the visual editor, you can use the JSON editor to review or update the entire ad optimization experience.
The ad optimization groups outcomes under three objects:
ad_configbumpersstitch_mode
Each parameter contains an ordered segments array. Every segment combines the conditions in rules with one or more outcomes in results.
Plan the configuration
Before defining the JSON, decide how the experience should behave at request time.
| Question | Response |
|---|---|
| Which attributes are available? | Identify the query parameters, request headers, media metadata, and SSAI context that can be evaluated in the request. |
| When should JIT or non-JIT stitching be used? | Determine whether specific devices, platforms, audiences, or content require a particular stitch mode. |
| How should traffic be split? | Decide whether a segment should use one result or distribute traffic across multiple weighted results. |
Having these decisions in place helps you define a clear, predictable configuration.
The following example defines an ad optimization experience that:
- Uses weights to split traffic for the Example segment between ad configs A and B
- Uses separate weights in the Default config segment to split unmatched advertising traffic between the same ad configs
- Enables both bumpers when all query, media, and date-time rules in the bumper segment match
- Uses just-in-time stitching when the
userquery parameter equals1
Learn more.
How is this ad optimization experience evaluated?
When JWX receives an SSAI request, it evaluates the ad optimization experience as follows:
- JWX evaluates
ad_config,bumpers, andstitch_modeindependently.- Within each parameter, JWX evaluates segments in array order, from top to bottom.
- A segment matches only when all objects in its
rulesarray evaluate to true. An emptyrulesarray defines an unconditional fallback segment.- JWX selects the highest-priority matching segment for that parameter.
- If the selected segment contains multiple
results, JWX distributes traffic proportionally according to each result'sweight.- JWX applies the selected result's
valuefor that parameter.
Define the JSON configuration
Follow these steps to define the JSON configuration:
- At the top of the page, click Edit JSON. The Edit ad optimization in JSON panel appears.
- Update the configuration. See the reference below for more information.
- Click Save. The JSON editor closes and the visual editor reflects the saved configuration.
JSON sample
{
  "parameters": {
    "ad_config": {
      "segments": [
        {
          "id": "{segment_id_A}",
          "name": "Example segment A",
          "results": [
            {
              "value": "{ad_config_id_A}",
              "weight": 70
            },
            {
              "value": "{ad_config_id_B}",
              "weight": 30
            }
          ],
          "rules": [
            {
              "comparator": "not-equals",
              "lvalue": {
                "key": "example_key",
                "keyspace": "query"
              },
              "rvalue": "0"
            },
            {
              "comparator": "equals",
              "lvalue": {
                "key": "title",
                "keyspace": "media"
              },
              "rvalue": "Example"
            },
            {
              "comparator": "less-than",
              "lvalue": {
                "key": "now",
                "keyspace": "ssai"
              },
              "rvalue": "2027-07-31T13:00:00.000Z"
            }
          ]
        },
        {
          "id": "{segment_id_B}",
          "name": "Default config",
          "results": [
            {
              "value": "{ad_config_id_A}",
              "weight": 75
            },
            {
              "value": "{ad_config_id_B}",
              "weight": 25
            }
          ],
          "rules": []
        }
      ]
    },
    "bumpers": {
      "segments": [
        {
          "id": "{segment_id_B}",
          "name": "Example segment B",
          "results": [
            {
              "value": "both"
            }
          ],
          "rules": [
            {
              "comparator": "not-equals",
              "lvalue": {
                "key": "example_key",
                "keyspace": "query"
              },
              "rvalue": "0"
            },
            {
              "comparator": "equals",
              "lvalue": {
                "key": "producer",
                "keyspace": "media"
              },
              "rvalue": "John Doe"
            },
            {
              "comparator": "less-than",
              "lvalue": {
                "key": "now",
                "keyspace": "ssai"
              },
              "rvalue": "2027-07-01T04:00:00.000Z"
            }
          ]
        }
      ]
    },
    "stitch_mode": {
      "segments": [
        {
          "id": "{segment_id_C}",
          "name": "Example segment C",
          "results": [
            {
              "value": "jit"
            }
          ],
          "rules": [
            {
              "comparator": "equals",
              "lvalue": {
                "key": "user",
                "keyspace": "query"
              },
              "rvalue": "1"
            }
          ]
        }
      ]
    }
  }
}
Top-level configuration
| Field | Description |
|---|---|
| parameters object | One or more settings that affect how the ad optimization experience is evaluated See parameters for more information. |
| Field | Description |
|---|---|
| ad_config object | Contains an ordered segments array that determines which ad config is broadcast to the viewer |
| bumpers object | Contains an ordered segments array that controls whether bumper videos are shown before and after an ad break |
| stitch_mode object | Contains an ordered segments array that controls the method used to stitch ads into the stream |
| Field | Description |
|---|---|
| id string | Unique identifier for the audience segment The JWX Platform automatically assigns this value to a segment when you create it in the UI. |
| name string | Human-readable segment name The name helps you identify and manage the segment but does not affect evaluation. |
| results array | One or more outcomes that JWX can apply when the segment matches See results for more information. |
| rules array | Conditions that must be met at request time for a viewer to receive an ad experience All rules must evaluate to true for the segment to match. An empty array defines an unconditional fallback segment. See rules for more information. |
| Field | Description |
|---|---|
| value string | Defines the outcome applied when the segment is selected The allowed value depends on the parameter. See values for more information. |
| weight integer | (Only for advertising) Controls how traffic is split by percentage between multiple results When an advertising segment has multiple results, JWX compares their weight values and distributes traffic proportionally. This does not apply to bumpers or stitch mode. NOTE: Weights are relative. For a selected ad_config segment with multiple results, JWX divides each result's weight by the sum of all result weights to determine its traffic share. Choose values that reflect the split appropriate for your configuration. The values in the JSON sample are examples only. |
| Parameter | Description |
|---|---|
| ad_config string | Unique identifier of the ad config that should be broadcast to the viewer |
| bumpers string | Defines bumper settings for the associated segment Possible values:
|
| stitch_mode string | Defines stitch mode for the associated segment Possible values:
|
| Field | Description |
|---|---|
| comparator string | Comparison operator for the lvalue and rvaluePossible values:
|
| lvalue object | Request or media data attribute that JWX evaluates using the rule's rvalueSee lvalue for more information. |
| rvalue string | Data the lvalue.key must match for the rule to apply |
| Field | Description |
|---|---|
| key string | Name of the request, media, or SSAI data attribute |
| keyspace string | Source of the value You can pass the key from different sources:
Learn about the media keyspaceThe media keyspace allows you to control the ad load based on the requested media item's metadata. You can reference the following fields:
Available media keys depend on the metadata populated for the requested media item. media/duration uses the duration calculated from the analyzed manifest, regardless of the duration stored in the media metadata. Media sources, source overrides, images, and tracks cannot be used as keys. |
FAQ
How do date and time conditions work?
When a date and time are applied, the segment is eligible only while the rule evaluates to true. After the timestamp condition expires:
- The rule no longer matches.
- The segment is excluded from evaluation.
- JWX continues to the next matching segment or the unconditional fallback segment.
The ad optimization experience does not fail or stop working. JWX evaluates the remaining applicable segments.
Updated 20 days ago